
Note: This post was initially published here as Bluemix and Watson – Getting Started Right, on this site. That article is also on developerWorks, as Bluemix and Watson – Getting Started Right. This blog post repeats a lot of that content, with some updates for new capabilities and functionality. It was most recently updated on July 8, 2019, as I added links to some great content that readers pointed out to me, that I felt compelled to share. Please forgive the duplicated content…..
In my role as a Customer Success Manager, I often talk to customers who are new to the IBM Cloud platform and the Watson services. Often I will spend a good hour or more talking to customers and answering questions about the best way to get started with the organization of the IBM Cloud environment, and some of the more operational concerns around cloud and cognitive development. Since I find myself answering these questions over and over, for over two years, I figured it would be good to update this blog post so I can easily share this information with even MORE customers. It also helps me remember all of the important things when I do talk on the subject.
Getting Started on IBM Cloud
Signing up for IBM Cloud is easy, all you need to do is supply a valid email ID which will be associated with the IBM Cloud account. This is fine for YOU, but what about your ORGANIZATION? When setting up an IBM Cloud account for your company or organization, it is best to use a functional ID (some teams call them service accounts) associated with your company. Just keep in mind that the IBM Cloud will be sending out automated emails to this account (warnings about service usage, services being deprecated, new services available, and other things). Make sure that you choose an email address that is monitored by someone, so you don’t miss any important notifications.
I KNOW it takes a little longer to set up a functional account within your company, and that it is a pain to go through the paperwork to justify it, but not having your IBM Cloud account tied to an individual will save you A LOT of time, effort and frustration in the future.
Learning the Cloud Concepts
This is a good spot to pause for a second, and take time to understand some of the basic cloud concepts that will impact how you organize yourself on the IBM Cloud. Looking at this picture may help:
The box in the upper left is my IBM Cloud Account, and this should be associated with a functional ID. This is the functional ID and email address where you will receive communications from the IBM Cloud team. It is also the Account which has access to EVERYTHING underneath it.
Next, there are two blue boxes for the Organizations, which represent different functional organizations (or projects) within the larger IBM Cloud Account. Even though the different Organizations reside in the same parent Account, the resources within those Organizations can have their visibility limited to only resources within that Organization.
At this same conceptual level are the two Resource Groups. These Resource Groups serve as the “home” for a variety of different infrastructure and IBM Cloud services. Access to these Resource Groups can be given on an individual basis, or can be assigned through the use of Access Groups. If you want to learn more about Resource Groups, Access Groups, and the IBM Access Management (IAM) system, read this great post on Getting Started with IBM Cloud IAM.
The ovals below each Organization represent Spaces. A Space can be thought of as an individual development environment, or development area, for the development of a cognitive application. Access to these environments is controlled by assigning people one of three roles at the Organization level, and one of three roles at the Space level.
Finally, at the base level, are the various IBM Cloud Services, which are deployed into either spaces or resource groups. These can be Watson based services (like the Watson Assistant service), infrastructure services (like the Virtual Server service), or other IBM Cloud capabilities (like the Weather or Blockchain services). Services essentially “live” within a particular Space or Resource Group, and the charges associated with a service are calculated and billed against the IBM Cloud Account. These charges are broken down by Organization/Space or Resource Group, for your own internal billing and tracking purposes. The IBM Cloud documentation on Account Hierarchies does a great job describing all of the above and has a great diagram describing the relationships between all of these things.
Getting Organized on the IBM Cloud Platform
We’ll assume that you took my advice, and have a generic corporate ID (like IBMcloud@acme.com) that is your IBM Cloud account. Now let’s get organized to support the development efforts of your organization on the IBM Cloud platform. I’ll give you a “default” setup that you should use as the basis for your strategy in setting up the IBM Cloud Platform, and I’ll indicate options you have and why you might use those options.
I do this from the command line, using the IBM Cloud command line interface (CLI). I heavily use the IBM Cloud CLI in my tool referenced by the Administering Your IBM Cloud Account article. For the purposes of this article, we want to create some new Organizations within our account, and we also want to create some new Resource Groups. Some of our projects may be hybrid projects, and may use services supported by both models – so we need to have associated areas. In this case, we’ll create working areas (which include organizations/spaces and resource groups) for the Tau project and the Epsilon project.
Note: We introduce some naming conventions here that are important to note. Here are our naming conventions:
- Organizations -> <project_name>_ORG
- For our example, the three organizations our three projects would be: Tau_ORG and Epsilon_ORG
- Spaces -> <project_name>_<environment>_SPC
- For our example, the Tau_ORG might have spaces called Tau_Dev_SPC and Tau_Test_SPC.
- Resource Groups -> <project_name>_<environment>_RG
- For our example, the Tau_ORG would have the following resource groups associated with the spaces above: Tau_Dev_RG and Tau_Test_RG.
- Access Groups -> <project_name>_<environment>_<usertype>_AG
- For our example, we might create the following access groups for our Tau_Dev_RG: Tau_Dev_Admins_AG, Tau_Dev_Managers_AG, Tau_Dev_Develop_AG
Here is what our command line looks like:
# Set the IBM Cloud API endpoint
ibmcloud api api.ng.bluemix.net
#
# Login to IBM Cloud, with -u username -p password
ibmcloud login -u IBMCloudAcct@acme.com -p "mypassword"
#
# Create new Organizations for Tau, Epsilon and Phi
ibmcloud iam org-create Tau_ORG
ibmcloud iam org-create Epsilon_ORG
#
# Print a list of all of the Organizations for this Account
ibmcloud iam orgs
The first command sets the API endpoint. The second command gets you logged in. The next two commands create your new organizations, and the last command lists all the IBM Cloud Organizations for your account. Check out the Getting Started with the IBM Cloud CLI documentation for more details on the various CLI tools and commands available to you. You will now see a listing of all of your new Organizations, along with your default organization.
Why set up these separate organizations on the IBM Cloud Platform? For a few reasons:
- It helps keep the work organized and segregated. With these in place, and once we get spaces set up, we can limit user access to only certain areas.
- It allows us to see usage and billing details by organization. I can see exactly what each organization (or project) is using, and how much of my total bill each project is responsible for.
Also keep in mind that these IBM Cloud Organizations are just a way to organize your IBM Cloud infrastructure. After reading the guide, you may decide to go with IBM Cloud Organizations that break up areas based on the roles of your users, the environments being supported, or specific lines of business within your organization.
Getting a Subscription
To this point in our setup of the IBM Cloud for the fictional Acme Corporation, we have assumed that you have used a “free”, or “trial”, tier of services. These give you enough resources to figure out what you would like to do on the IBM Cloud and allow you to build small demo applications based on the IBM Watson services.
Now since we are talking about doing “real” application development work, we’re going to need more capability than these trial and free versions of the services provide. That means that you will need to spend some amount of money to host these various services and capabilities. Check out this nice overview of the various IBM Cloud Account Types to get an idea of your options. The capabilities and limitations of these options differ, so it is important that you understand them.
For our fictional Acme Corporation, we have decided to go with the popular subscription option. To begin the process of getting a subscription, you will want to follow the directions on how to obtain a subscription on the account types page. Make sure that your subscription is associated with the right IBM Cloud account (the one with the functional ID, remember that?). Once you get your subscription, you will get a “code” that needs to be entered – make sure that you enter it in while logged into your Functional ID (we’re using something like IBMcloud@acme.com).
Now that we have our organizations all set up, and our subscriptions associated with the correct projects within the fictional Acme Corporation, it’s time to set things up for our development teams. I understand that some readers are working for smaller, more nimble organizations. You may be fine with doing things in an ad-hoc manner, and that may actually be the best working model for you. What follows is a broad outline of what larger organizations, seeking a better separation of duties, control of environments, and implementation of a more standard software development lifecycle and DevOps culture will want.
We begin with our IBM Cloud Account and our IBM Cloud Organizations. For our purposes here, we will focus on just one of our fictional Acme projects, the Tau project. You begin by creating Spaces for each project. To begin, you need to find out what environments each project will need. Most will need a development environment, a test environment, and a production environment (at a minimum). Some projects will want support for additional environments.
For each project, go out and create the appropriate Spaces for the project. Spaces need to have unique names. For the Acme Tau project, we create support for two initial environments – called Tau_Dev_SPC and Tau_Test_SPC. We realize that we will need to build a production environment, but we’re not quite ready for that yet, so we can do that later.
Now lets use the IBM Cloud CLI to go and create the spaces that we need (Note: This can also be done interactively from the IBM Cloud UI – but I know that you are interested in automating this, so I will focus on showing a script using the CLI):
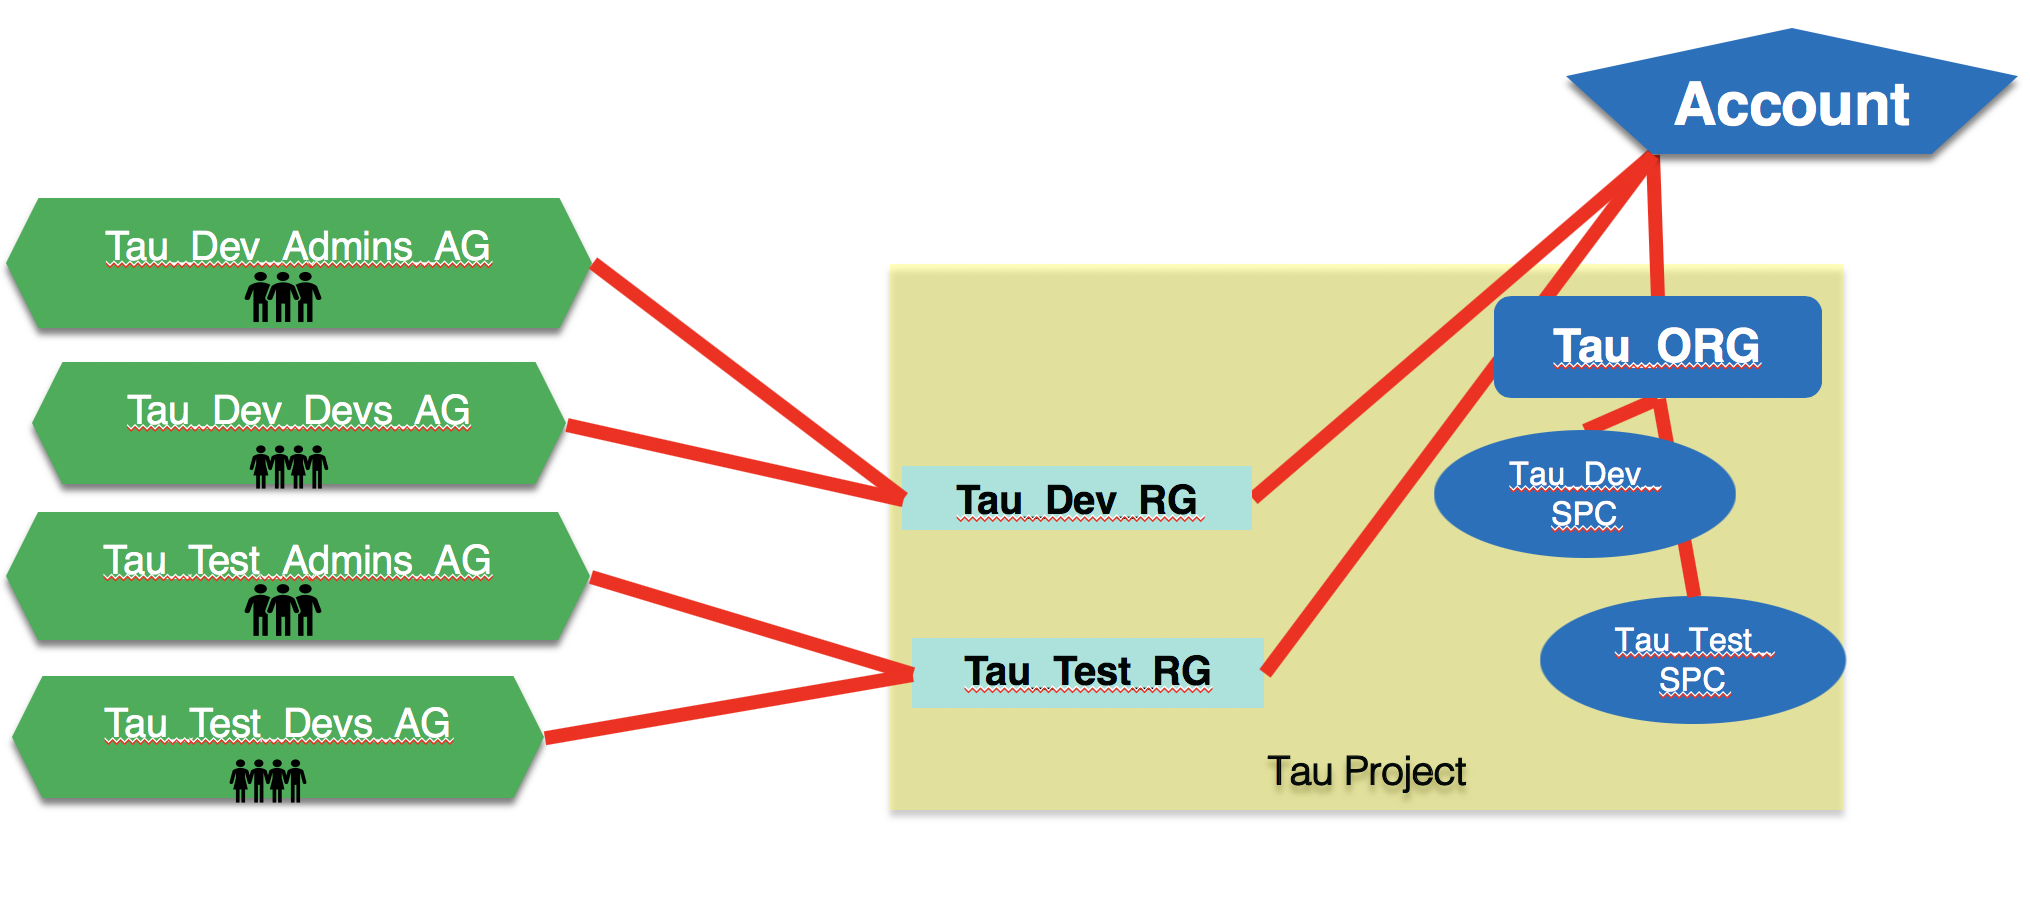
This results in an environment within the account which looks like the diagram below.
# Set the IBM Cloud API endpoint
ibmcloud api api.ng.bluemix.net
#
# Login to IBM Cloud, with -u username -p password -o organization
ibmcloud login -u IBMCloudAcct@acme.com -p "mypassword" -o Tau_ORG
#
# Create new Spaces within the Tau_ORG organization,
# and within the Epsilon_ORG organization
ibmcloud iam space-create Tau_Dev_SPC -o Tau_ORG
ibmcloud iam space-create Tau_Test_SPC -o Tau_ORG
ibmcloud iam space-create Epsilon_Dev_SPC -o Epsilon_ORG
#
# Create related Resource Groups for Tau_ORG and Epsilon_ORG
ibmcloud resource group-create Tau_Dev_RG "Trial Quota"
ibmcloud resource group-create Tau_Test_RG "Trial Quota"
ibmcloud resource group-create Epsilon_Dev_RG "Trial Quota"

You can double-check your results either from the IBM Cloud CLI (using the “ibmcloud iam spaces” and “ibmcloud resource groups” commands), or from the IBM Cloud dashboard. This merely sets up the structure for your teams, the individual teams will need to populate these spaces and resource groups with services to make them useful. As an IBM Cloud administrator, you should not have to do this. The creation of any needed services should be left to the individual project teams.
Getting Everyone Else Onboard
So now that you have your projects and environments all set up, you are ready to go. All that you have to do now is get your developers and other stakeholders into the environment. The first step is to get your staff to register for the IBM Cloud and to get their own accounts. I STRONGLY suggest that your force them to register with their company email addresses. It will make things easier for you to administer things as time goes on.
Note: Another reason that I STRONGLY suggest that your force users to register with their company email addresses is that most of my customers decide to federate their identities – meaning that they then will log in and authenticate with their corporate credentials (john.doe@acme.com, with the Acme password) for the IBM Cloud. It allows you to do all sorts of great things – for more details see my GitHub page on IBM Cloud Onboarding.
After your team has registered, you can invite them to the correct IBM Cloud Spaces and IBM Cloud Organizations. So once again we will use the IBM Cloud CLI, and send the invitations that we need (Note: This can also be done interactively from the IBM Cloud UI – but I know that you are interested in automating this, so I will focus on showing a script using the CLI):
This gets your users added to the proper organizations and spaces. Some important things to keep in mind when assigning organization roles and space roles to your users.
- Give everyone OrgAuditor for their ORG_ROLE. This allows them to see what is going on at the organization level, but doesn’t allow them to change anything. The only exceptions to this are the people who do administration of the organization (your IBM Cloud Administrator), and handle the billing associated with the organization (often the IBM Cloud Administrator as well).
- Space roles are a bit different.
- SpaceManager: This role can invite and manage users, and enable features for a given space. You may want to give this to the development lead for the Development spaces, the test lead for the Test spaces, and your operations leader for the Production spaces.
- SpaceDeveloper: This role can create and manage apps and services, and see logs and reports. Give this role to developers in the Development spaces, but you probably don’t want anyone with this role in the Testing and Production spaces. This allows you to maintain the stability of these environments (no code changes).
- SpaceAuditor: This role can view logs, reports, and settings for the space. This is used for people who might be interested in the development efforts in a given space – but not requiring access to change anything within the space.
# Set the IBM Cloud API endpoint
ibmcloud api api.ng.bluemix.net
#
# Login to IBM Cloud, with -u username -p password -o organization
ibmcloud login -u IBMCloudAcct@acme.com -p "mypassword" -o Tau_ORG
#
# Send invitations to the various team members within the Tau project
# arguments are: USER_NAME ORG_NAME ORG_ROLE SPACE_NAME SPACE_ROLE
ibmcloud iam account-user-invite john_smith@acme.com Tau_ORG OrgAuditor Tau_Dev_SPC SpaceDeveloper
ibmcloud iam account-user-invite jane_doe@acme.com Tau_ORG OrgAuditor Tau_Dev_SPC SpaceDeveloper
ibmcloud iam account-user-invite tom_tester@acme.com Tau_ORG OrgAuditor Tau_Test_SPC SpaceDeveloper
#
# Create access groups, and then assign team members
# to various access groups
ibmcloud iam access-group-create Tau_Dev_Admins_AG -d "Tau Dev environment administrators"
ibmcloud iam access group-user-add Tau_Dev_Admins_AG john_smith@acme.com
#
ibmcloud iam access-group-create Tau_Dev_Devs_AG -d "Tau Dev environment developers"
ibmcloud iam access group-user-add Tau_Dev_Devs_AG john_smith@acme.com
ibmcloud iam access group-user-add Tau_Dev_Devs_AG jane_doe@acme.com
#
# do the rest of your projects and users in a similar manner
...
You will probably want to automate this, or provide a self-service capability, so people can easily request access to the environments that they need. If you’re not sure where to start with this, then go and read my post on Administering Your IBM Cloud Account – A script to help, it has a link to a GitHub repo with some Python scripting that will do some this for you.
Herding the Cats
At this point we have our IBM Cloud environments set up, and we have our users added into the environment where they need to be, with the access that they require. Our fictional Acme environment looks a little something like this:
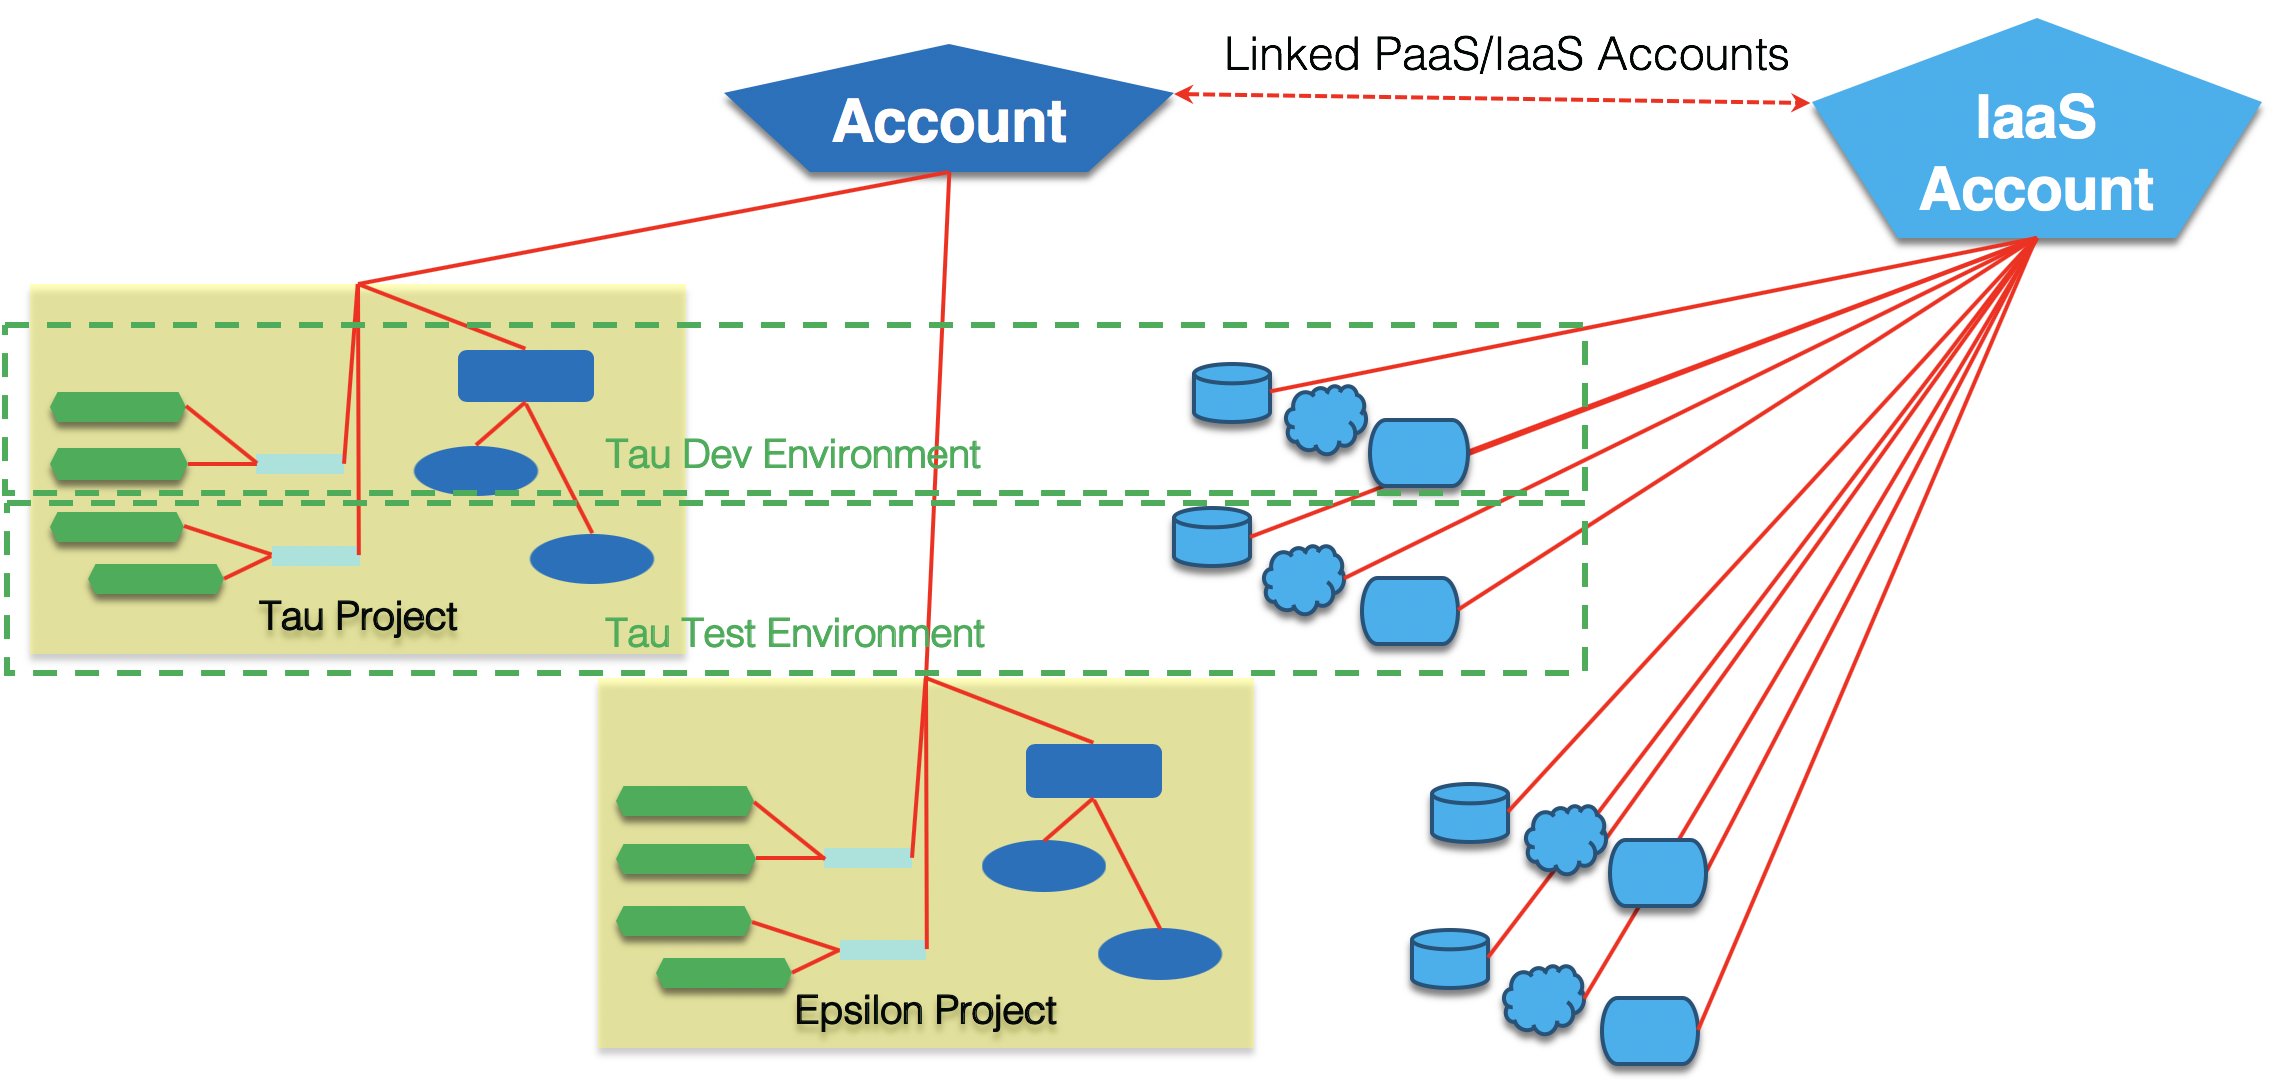
You’ll note that we now are showing the infrastructure resources (like virtual machines, file storage, block storage, object storage, etc.) being deployed from the IaaS account which is linked to your IBM Cloud account. We haven’t spend a lot of time focused on this, as these resources are typically created on an as-needed basis – and they have a different set of concerns and networking and access concerns.
Each of our projects now has the ability to control access to their IBM Cloud areas, and can effectively isolate their various environments. Each is free to use whatever promotion process and DevOps tooling they prefer, or they can utilize the IBM Cloud Toolchains and the IBM Cloud Continuous Delivery service. I strongly suggest that you use a DevOps solution which addresses ALL parts of your development process, regardless of where they reside.
There are some important things to consider when thinking about the topic of DevOps in conjunction with the IBM Cloud and the IBM Watson services.
- Watson services where you do not provide any training data (Document Conversion, Language Translator, Personality Insights, Tone Analyzer, Text-to-Speech (TTS) and Speech-to-Text (STT) ), can be deployed to additional Spaces (or Resource Groups) and do not need to have their data migrated from one environment to the next. Keep in mind that on occasion the versions of the API and underlying services may increment, so you will want to control which API endpoints are used for these services. (Note: If you have customized either Text-to-Speech or Speech-to-Text, then these services will need to be migrated from environment to environment.)
- For Watson services with training data (Conversation, Discovery, Natural Language Classifier (NLC), Retrieve & Rank (R&R), Natural Language Understanding (NLU), and Visual Recognition), you will need to deploy these to environments and migrate their data. There is currently no mechanism in place to copy service instances from one Space (or Resource Group) to another. This has some very real implications beyond the operational aspects.
- For services like Conversation which support an export/import functionality, it means that you can choose to do your training through the REST API, or interactively through the tooling provided on the IBM Cloud. When you are ready to move an instance from one environment to another, you export from one environment, and then create a new instance in the target environment, and import your data.
- For services like Discovery, which do not have an export/import capability, you should resist the temptation to train “by hand”, and instead have a script (or series of scripts) that can be used to train your system. In this way, you can more easily create/recreate an instance of the service.
Conclusion
This should give you enough of an overview, and offer you links to enough information, so that you can begin using the IBM Cloud platform to develop cognitive applications with confidence. Technology changes rapidly, so if you see problems with this basic approach, or have some best practices to share, please reach out to me.
Good Reference Materials
- My Slide Deck – a slide deck that highlights many of these concepts.
- IBM Cloud command line interface (CLI) – The reference page for the IBM Cloud specific CLI. Please use the IBM Cloud commands and not the Cloud Foundry equivalents, to ensure smooth operation of your Cloud environments.
- IBM Cloud Onboarding Landing Page – a community maintained landing page with links to proven articles and technical content that is useful for teams just getting into the IBM Cloud.
- Administering Your IBM Cloud Account – A script to help – has a link to a GitHub repo with some Python scripting that will do some basic administrative operations for you. Also logs the commands so you can HOW to do things from the IBM Cloud CLI.
