I just worked with a customer this week on an issue that they had – and the solution didn’t seem obvious, so I figured that I would share it with a larger audience.
The Issue
My customer has a couple of Watson Discovery instances in the IBM Cloud environment. These instances are supporting a cognitive application that they have acting in an expert assistant role – providing quick access to guidance and information to their associates. One instance is a Discovery instance which is supporting the production environment, the other is supporting their development and test environment. Both instances are Small sized.
They realize that they would like to save some money by using a smaller size instance for their development and test environment, where they think they only need an X-Small sized instance. They asked me for some guidance on how to do this.
The Background
This is not as simple a request as it might seem at first. The issue is that once you move into the Advanced sized instances (instead fo the free Lite instances), your Discovery instances begin to cost you money. They also can be upgraded from one size to a larger size, but they cannot be shrunk. Why? We can always expand and allocate additional resource to an instance, but we cannot guarantee that there will be no loss of data when shrinking instances. So we don’t shrink them.
It’s probably best to start by looking at the various sizes and plans. Looking at the Discovery page on the Cloud dashboard gives you some idea of the costs and charges, but it is not easy to read. Instead, I find that the help pages on upgrading Discovery, and Discovery pricing, are much more helpful. The table on each of these pages are informative and when they are combined, they give you the basics of what you need to know (this is accurate at the time of publishing – November 2019).
| Size | Label | Docs | Price |
| X-Small | XS | 50k | $500/mo |
| Small | S | 1M | $1500/mo |
| Medium-Small | MS | 2M | $3k/mo |
| Medium | M | 4M | $5k/mo |
| Medium-Large | ML | 8M | $10k/mo |
| Large | L | 16M | $15k/mo |
| X-Large | XL | 32M | $20k/mo |
| XX-Large | XXL | 64M | $35k/mo |
| XXX-Large | XXXL | 100M | $45k/mo |
One other IMPORTANT difference between the plans is this: Each plan gives you a single environment that supports up to 100 collections and free NLU enrichments. The only exception is the X-Small plan, which will only support 4 collections. Also, note that you may also pay additional for news queries and custom models.
What Needs To Be Done
In order to “downsize” one of their Discovery instances from Small to X-Small, the customer will need to migrate the data themselves. What makes this difficult is that they will only have 4 collections available to them in the X-Small instance, instead of the 100 that were available in their Small instance. So they need to take these steps:
- Create a new Discovery instance, with a size of X-Small.
- Select the 4 (or fewer) collections that will be used in the new X-Small instance.
- Re-ingest documents into the 4 new collections.
- Delete the old development and test Discovery instance.
Creating a Discovery Instance of a Certain Size
The issue that my customer ran into was this: How do I create a Discovery instance of a certain size? When I look at the Discovery page on the Cloud dashboard , all I see is that I can select the Advanced plan – but no option on what size to use. So how do you do it?
It’s simple, and it’s outlined in the help docs in the section on upgrading Discovery. You first need to go in and create a new instance of the Discovery service with the Advanced plan. After you do this, the service will take some time to provision. You’ll need to wait patiently while this is done – it’s usually less than 2 minutes.
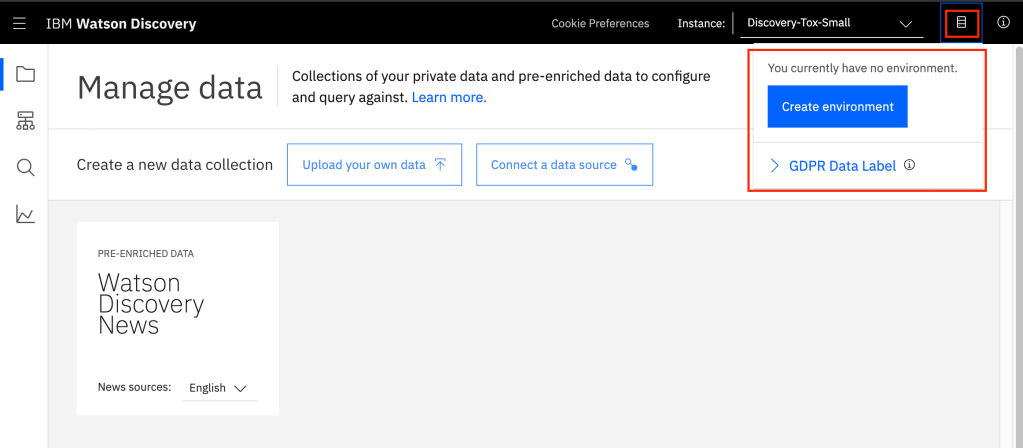
Now open your Discovery instance, by clicking on the link, and then choosing the “Launch Watson Discovery” button on the Manage page. You will now see the Discovery instance come up, and you will click on the small icon in the upper right corner of the browser to bring up a dialog that will allow you to “Create Environment”.
Then you will be able to select the SIZE of the Discovery instance that you want. You will see a dialog that looks similar to what is shown below:
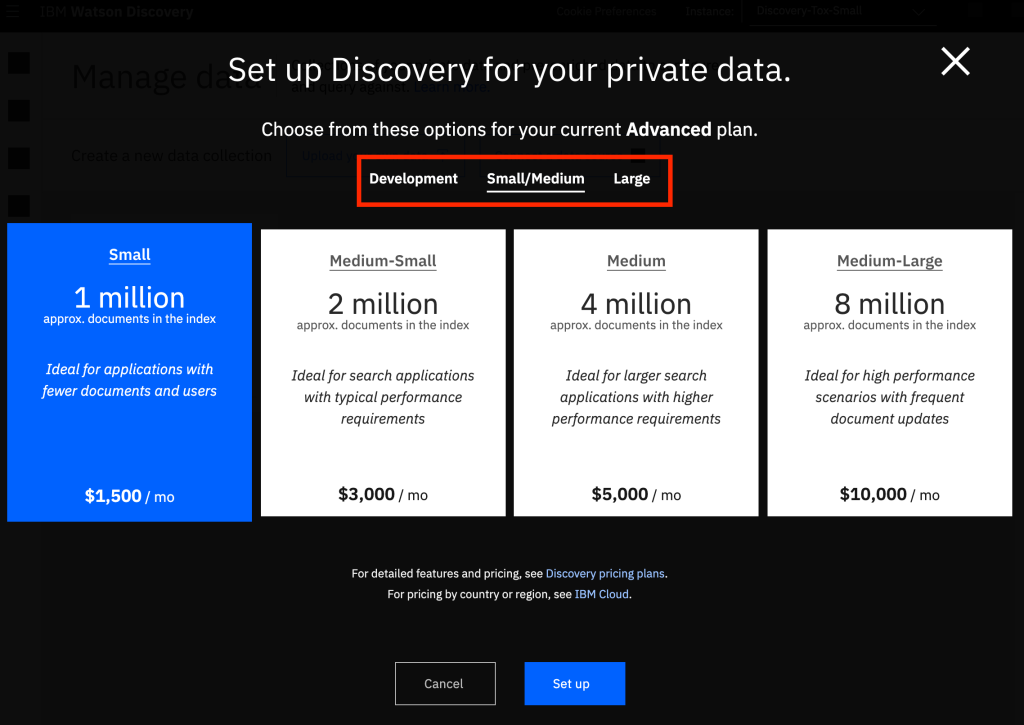
See that you can choose from three different menus: Development (which shows the X-Small option), Small/Medium (which shows the Small through Medium-Large options), and Large (which shows Large through XXX-Large). Choose the size that you want, and then hit the “Set Up” button. This will create your Discovery environment, in the size that you want.
What If I Want To Increase the Size of my Discovery Instance?
In the above case, we had to do some specific actions to get a new instance created in a size that we wanted. We also learned that if we wanted to SHRINK in size, we needed to create a new instance and migrate data to the new instance.
What if I have been using Discovery for a while now, and I want to INCREASE in size? How do I do that? it’s actually pretty simple, and it’s also documented in the online help, in the section on upgrading Discovery. it just provides a link to the API, but not a lot of additional explanation. I’ll give you a bit more, so it’s a bit more clear.
If you look at the Discovery API reference, you’ll see a section on Update an Environment. This is the API call that you can use to upgrade your environment (and thus, the size of your Discovery instance). The API call is spelled out in this doc, and you can get examples for whatever language or way that you want to generate this API call by just selecting a type for the example in the black window on the right. In the example below, I chose to look at this in Python.
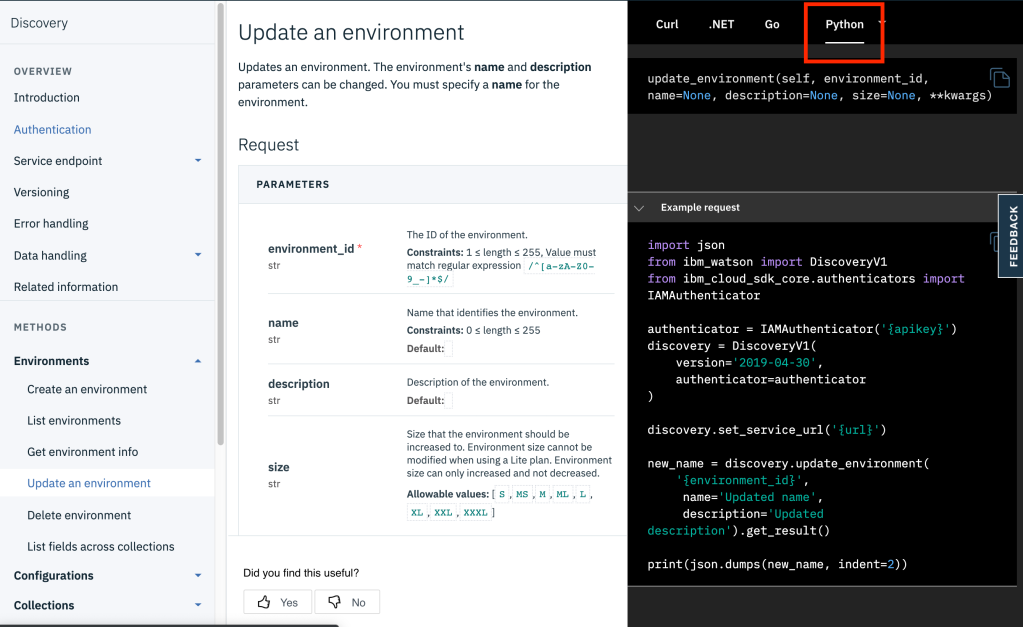
Just make sure to use the “size” parameter in your API call, and make sure that you use the right code for the size that you want (the label from the table earlier in this post). That’s all there is to it.