
Note: I updated this article on March 3, 2021 to update the links in the article. One of my peers, Dan Anders, had passed this article along to a customer and informed me that all of the links in this article were broken. Thank you for the feedback Dan!
I like to answer customer questions on the IBM Cloud, and about using Watson services on the IBM Cloud. Sometimes I know the answer… sometimes I have to go and find the answer… and sometimes I create the answer. As I encounter interesting questions, I like to share my solutions and answers on this blog – so that way I am able to help other people who may be encountering the same issues.
Recently I have been seeing a lot of questions about how authentication on the IBM Cloud works, and what the “best practices” around authentication are. It’s a large topic, and I cannot cover it completely in this blog post, but hopefully, I can cover it to a depth that will help you make decisions about how you want to structure your IBM Cloud/Watson application.
Getting Into The IBM Cloud
You get into the IBM Cloud using your own username/password to authenticate. You might even use two-factor authentication to get in. The access to all of the services and accounts on the IBM Cloud is controlled by the IBM Cloud Identity and Access Management (IAM) service. This service validates your identity and then assigns your access and permissions based on that identity.
When an application attempts to access resources on the IBM Cloud, it too needs to have it’s identity validated. Most IBM Cloud users will create either a service account (with its own login, password, and credentials) or will create some specific service credentials for every cloud service.
So the first step is to have your application authenticate itself, with some sort of credentials. To do this you will make your API call to the API endpoint that you are attempting to access. This call will go through the IBM firewall, which takes care of traffic routing, ingress, load balancing, and some other “big picture” types of things. Your request is then routed to the authentication service. This service will attempt to authenticate your request.
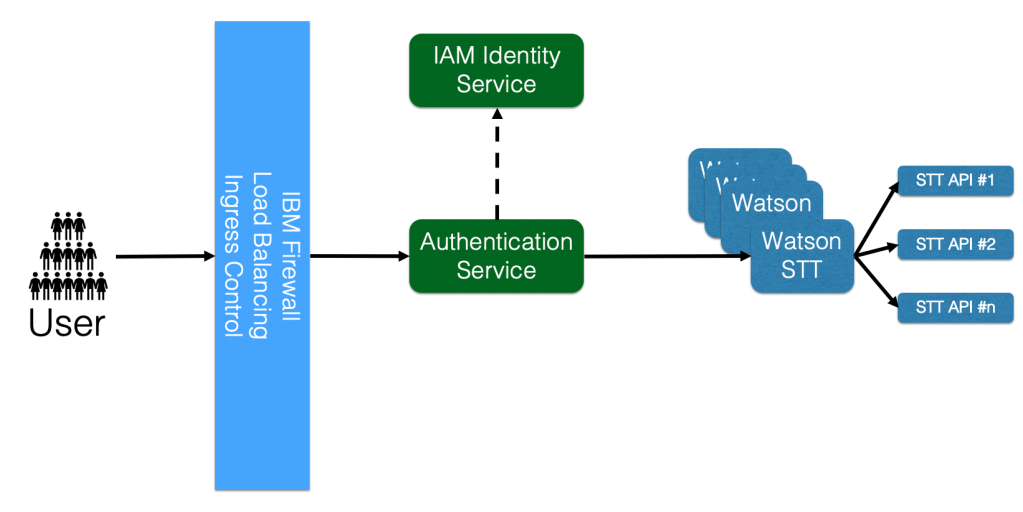
It is at this point that things get interesting for an application developer. You must choose from one of two paths:
- You can give the authentication mechanism an API Key. The authentication service will then validate the API Key. It does this by calling the IAM Identity service. Once you have been authenticated, your request is passed along to the appropriate Watson service instance.
- You can give the authentication mechanism an API Token. To get this API Token, you will first need to call the IAM Identity service, give it your API Key, and ask for an API Token. You can then make your call and give the authentication mechanism this API Token.
So why would you want to take approach #2? You want to take approach #2 as much as possible because when you authenticate via an API Token, you do not make an additional call to the IAM service when authenticating. These API Tokens are good for between 30 to 60 minutes, depending on your service.
If all of this seems a bit confusing, and you would like to see some more detail about this whole process, check out the step-by-step documentation on Invoking IBM Cloud Services APIs.
How Much Do I Save?
Let’s look at a simple example. If your application will make 1000 calls to the Watson service in a typical hour of usage. If you just use the API Key approach, you will make 1000 additional calls to the IAM service. Each call will the API Key will require the authentication service to make a request to the IAM service.
If you decide to use the API Token method, you will make an extra call to the IAM service to get your token, and then you will make your initial service call. This is 1 additional call to the IBM Cloud. So in a typical hour, this will save you 999 service calls within the IBM Cloud.
The savings here for a single call to a service may be difficult to measure and probably would go unnoticed by an end-user. But during periods of high traffic and high load, this reduction in traffic and load will make your application much more robust, responsive and resilient.
Why even bother with the API Key approach? It is useful for testing scenarios and for times when you just want to issue curl calls by hand, directly to the API. In these cases, it is much nicer to just do the call once, rather than having to get a token and then use the resulting token (which can be large).
How Do I Do It?
Set up a small section of code to request your API Token, and then save that token and insert it into every API call made to services on the IBM Cloud. You’ll then need to decide on how you want to handle renewing your token, since every token is only good for 30 to 60 minutes (depending on the service).
You can either set a timer and wake up to renew your token before the previous token expires. The other option is to just handle authentication errors in your application by refreshing your token and trying to execute your request again with the new token.
