It’s been a busy past few weeks for me, and I ran into a situation that I have seen in the past, and I wanted to share some knowledge about voice assistants. Most people just don’t understand the complexities and limitations of the technology with voice assistants, so I thought that sharing this particular use case, and the difficulties of it, might be helpful for some people.
My Voice Assistant Situation
One of my customers had a desire to have a voice assistant understand and respond to questions about people, and have the ability to recognize the names of the people being asked about. This would require a customized Speech-to-Text (STT) model that could listen to user utterances, and translate those into the names of people. In this scenario, my customer wanted to be able to handle a wide variety of different names and surnames. They also wanted to be able to handle a variety of different English accents.
This particular customer has been listening to a variety of industry “experts” and sales professionals about how AI is going to answer all of their questions, and solve all of their problems… if only they would give it a chance. The people in charge of the business look at the things that home assistants and other commercial applications can do, and they feel like this kind of thing should be feasible, easy to do, and relatively quick to implement.
You might be dealing with something similar. If so, have your people in charge read this article. It will help them understand the difficulties in doing some of these things — and give them some more realistic expectations.
The Initial Assessment
This is EXTREMELY hard for a Speech-to-Text (STT) service to accomplish, due to the almost infinite variability in pronunciations and spellings of the names of people.
Most of this is not unique to any one sub-culture of names (people often struggle with Indian, Arabic, and Asian names), it happens with names in general. Take a name like “Dawn”. Common pronunciations of the name could translate to the name Dawn (what you want), or to the concept of “dawn”, the product name “Dawn”, the male surname “Don”, the direction “down”, the action of “drawn”, the noise “din”, etc (all of which you do not want). That confusion is all for a single syllable, female, Anglo-Saxon, name.
Now factor in the complexities of a multi-syllabic name. And what about the seemingly random jumble of letters that some names appear to be? As humans, we often abbreviate people’s names to avoid situations like this, just so we don’t constantly mangle people’s names. We do this with my nickname, “Tox”, so people don’t mispronounce my last name of “Toczala” (which is pronounced TOKS ALLA). We do it for Bob, Cindy, Mike, Candy, Joe, and others — and the base of those names is quite common.
Another factor that can make name differentiation difficult is the structure of many names, regardless of the language of origin. Some names are either single word or compounded terms from the language. Names like Cooper, Hammersmith, Wordsworth, Ginger, Penny, and others. You also run into issues when dealing with some of the “newer” names and naming conventions followed in recent years. How do you expect your STT service to translate “M. Night Shyamalan”? What about “North West”? Or “Daisy Bloom”? Even worse, how about names with embedded actions in them? Like “Christopher Walken”? or “Paige Turner”? How do you recognize the names, the verbs, and the punctuation in this? I’m not even mentioning “Buffalo buffalo Buffalo buffalo buffalo buffalo Buffalo buffalo“. Our systems need some guidelines to follow, some basic rules and patterns to follow. When it comes to names and titles for people, the rules of the language seem to get suspended — which makes it extremely difficult for a voice assistant to get it right.
Going Further Down the Rabbit Hole
So with all of the challenges I discussed above, you can see why this use case is difficult to implement. We compound that difficulty when we ask to do this with a wide variety of speech accents. You have multiple varieties of American English (common Midwestern accent, Brooklyn accent, Boston accent, etc.), as well as the more refined UK English that most Indian speakers will pattern on. Then there are the various Latin-tinged English (some might call it Spanglish) accents that you hear from people who have Spanish as a first language and English as a second language. Let’s start with the phrase, “Park the car, take the ticket and pay the fee”. Now imagine understanding this as spoken by four different people :
One with a Midwestern accent
One with a Boston accent
One with an Indian English accent
One with a Southern drawl
You will get four greatly different translations. The first three words might all be different between these four different speakers. Even a highly customized language model like Siri (which is highly specialized for general talk and a variety of accents), struggles constantly with people’s names and accents.
The last complicating factor (as if the above wasn’t tough enough), is the whole idea of spelling. Names get spelled in ways that are not close to how they are pronounced. Typical examples of this include names like “Nguyen”, “McConaughey”, “Weinstein”, “Jesus”, “Baughman”, and others. These names are spelled in ways that you could not predict from the way that they are pronounced. And first names have multiple spellings all over — is it “Andy”, “Andi”, or “Andee”? “Tony”, “Toni”, or “Tone”?
Why Are We Here Anyhow?
So why all of this excuse-making for how hard general name recognition is? Why are we trying so hard to personalize our voice assistants? What is the payoff — what is the value of calling Tox by his first name?
Considering all of these challenges, building and maintaining a highly efficient and accurate language model for something like this would be expensive (in terms of time and money). And it would still suffer from inaccuracies and failures on things like homophones (new, knew, gnu), name collisions (smith, smythe), and all of the other cases that I have outlined above. In the big picture, is all of the work and complexity worth it? Wouldn’t all of that effort be more productive if it were targeted at something else that had a more definite impact on the performance of your voice assistant — and on the general satisfaction of your end-users? Maybe spend that effort on setting up some automated testing?
An approach that might be worthwhile to explore is having people attempt to spell the names of the people that they are interested in, and then let the users “filter and downselect” to the person that they intend. Often human assistants will require you to spell out a name for them — we’re used to doing that.
You should be VERY careful about how much information (and what kind of information) you provide — releasing personal information without any controls in place can be risky (and run afoul of GDPR and similar regulatory constraints).
The customers with systems that will return personal information to users, will often require some sort of account validation or login, at which point you already KNOW the person’s name (and how to spell it). They also tend to not rely on names — instead they use identification numbers, or some other unique key information, to identify users. Names are not unique — neither are addresses.
One other approach would be to attempt to translate names, and immediately fail out to spelling the names. As time goes on, your STT model may improve and your bot would ask for spelling less often. But this would require a commitment to constantly work on improving and managing your STT custom models specific to names. You would need to continually be adding customization data in the form of a name and the phonetic pronunciation of the name. Seems like a lot of work and cost for something with limited value.
So the real takeaway here is this: don’t try to get people’s names from speech-to-text engines. It’s too hard and requires too much effort to support. There is nothing wrong with personalizing the experience of your end-users, but get that name information from somewhere else.
I have been working with multiple customers who are now deploying COVID-19 chatbots. Many of them are new to using cognitive technologies, and more specifically to using and applying chatbots. For many of these customers, the questions that they ask are very similar.
One of the most common requests that I’ve been getting lately, are questions about “How are we doing compared to…?”. My users and customers are eager to find out and share best practices for the development of their chatbots. Some of this is more technical and coding in nature — focused on how the chatbot looks, how to include it on a web page, how to integrate it into Facebook, or how the chatbot interacts with users. Some of these best practices questions are more focused on the information being shared, and what some of the most popular end-user requests have been.
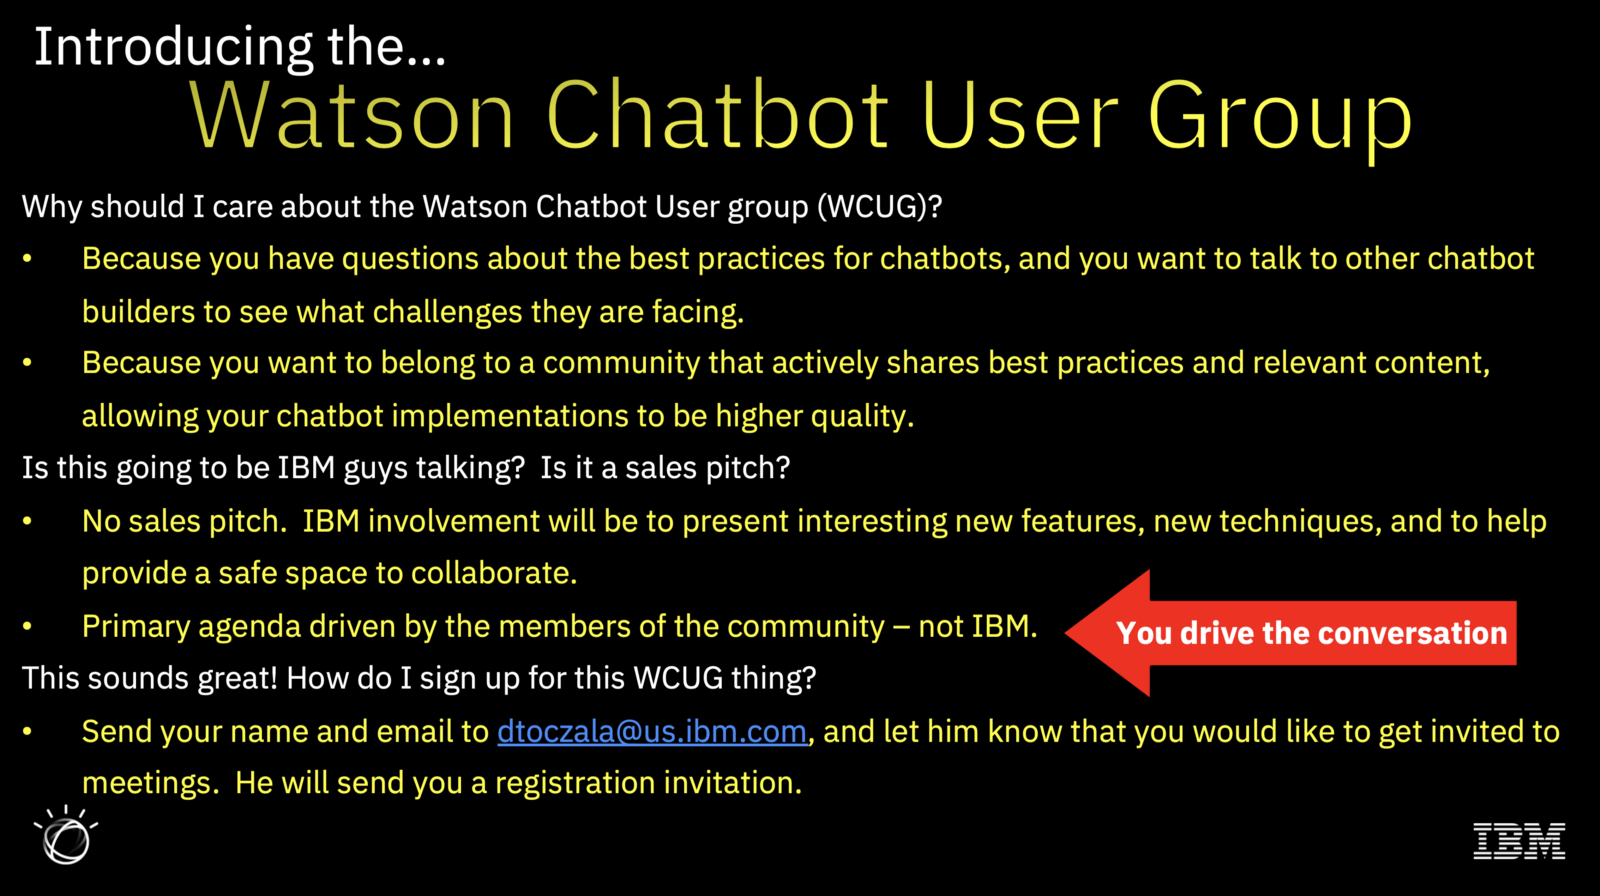
I am also hearing from other people inside of IBM, that we need a way for our users to be able to share their experiences, their victories, their frustrations, and other important information. So I have decided that it is time to create a Watson Chatbot User Group (WCUG).
What Will The WCUG do?
The Watson Chatbot User Group (WCUG) is going to be a weekly meeting, with an agenda determined by the user group itself. I will provide some potential topics for discussion, but I want to leave the agenda and prioritization of the list of weekly topics up to the user group itself. If the group would like to have a presentation from an IBM subject matter expert, in some area of chatbot technology, then I will do my best to get those people to present to the user group.
The main goals of this user group are to provide an open forum for people to discuss best practices and techniques that work in the real world, for the development of chatbot based solutions. I want to promote the sharing of knowledge and content which will allow all members of the community to provide higher quality and higher value solutions for their own end-users.
This will NOT be an endless IBM Sales pitch. The topics and agenda will be driven by the community — I am interested in what YOU are interested in. I just want to provide a safe place to share knowledge, communicate, and collaborate.
This Is Wonderful!! How Do I Join?
Right now this user group is just getting off the ground. So we don’t have any kind of automated sign-up or any permanent location to house community approved assets. So if you would like to participate in these calls, please send your name and your email to me at dtoczala@us.ibm.com. I will add you to the weekly meeting invite.
Once we get going, we will provide a more permanent home for the community, as well as some areas where the community can collaborate and share information. I plan on having the first meeting on June 24. So please don’t hesitate, and send me a note with your name and email address, telling me that you would like to participate in the Watson Chatbot User Group (#WCUG).
Note: This article was updated on April 29, to add links for a Leigh Williamson blog post that I found informative.
In an earlier blog post, IBM Watson Fueled Chatbots — For Our Health, I talk about the costs and benefits of a chatbot, and show you how a chatbot is within the reach of most organizations. I then branch out and discuss how to make updates to your chatbot, in my post called, I Love My Watson Chatbot — How Do I Update It? Now we look at doing some continuous testing, and how to do some basic version control and deploy new chatbot updates.
How Are We Doing?
In order to see how well your chatbot is performing, you need to put some automated testing of your chatbot in place. This will help you get some objective measures of chatbot accuracy and performance, and will also give you some insight into areas where your chatbot could stand to improve. Keep in mind that testing cognitive applications is fundamentally different from testing more traditional applications. Traditional applications relied on path testing, and code coverage. Due to the non-deterministic nature of cognitive applications, we end up having to use statistical models for our testing.
I STRONGLY suggest using the Python notebooks listed below. These can be run on your own machine, or from within Watson Studio. They are a great starting point for your automated analysis of your chatbot. Over time you can improve these notebooks and expand on some of the testing techniques in them.
Log Analysis Workbooks — these two notebooks focus on slightly different areas, and do an analysis of your chatbot based on your logs.
My K-Fold Notebook — not as full-featured as the two notebooks above, but I like mine because it’s simple. For a new Python user, it also has a straightforward approach to k-fold testing that is easier to understand.
Getting the feeling that you need to know a little bit of Python? So am I. You don’t have to be a Python expert to do any of this, but you should at least understand the basics of Python, and how to use and manipulate Python notebooks. Don’t get intimidated — you don’t need to know EVERYTHING before you start — just jump in and learn things as you go.
Making Changes Without Impacting Production
Some change management scenarios are enabled by using Watson Assistant’s new versioning capability. This versioning is a bit different than some versioning that you might be used to — it’s not like a typical software development check out, check in paradigm. Instead, it is more like a baseline establishment paradigm, where a version (or baseline) is created as a snapshot of the model at some point in time. The current state of the model (which you see in the UI) is always the tip, or development version.
So if you go into your Watson Assistant Plus instance, and go into your skill, you can just click on “Versions” in the left-hand nav bar, and you will see the versions screen.
Versions Screen in Watson Assistant
In order to drop a new version (or baseline), just click on the “Save a new version” link in the upper right corner. You should then fill in something useful (think about naming conventions!) for the description, before pressing “Save”. We will talk more about naming conventions below, when we start to talk about some typical change management workflows.
Typical Change Management Workflows
A typical change management workflow will allow you to easily scope, contain, and then deploy changes to your chatbot. What I am proposing here is something that might not satisfy a “DevOps Purist”, since we have production and dev/test resources residing in the same service.
Keep in mind that this approach CAN easily be modified so that instead of moving the versions around within a Watson Assistant instance, we could export the model from one Watson Assistant environment (say the test environment), and then import it into another environment (say the production environment). These environments could be located in different resource groups, with individualized access and permissions tailored for each environment/resource group.
So without further explanation, here is a high-level view of a typical lightweight change management process for your Watson Covid-19 chatbot:
Get suggested changes for the next cycle. Save these in some agreed upon format/tool with changes for your Covid-19 bot.
Agree on changes and scope of changes for the next cycle. For those of you who are familiar with Agile development principles, think of this as sprint planning….
Apply these changes in the tip (development) version of your Covid-19 bot
Test development Covid-19 bot version — validate your changes — make final revisions
Run automated quality tests against development bot version (yes, I wasn’t kidding about automated tests earlier, do this now — and you will thank me later)
Create a new version in the Covid-19 bot — call it “<YYYY-MM-DD> Production”
Get formal sign off for promotion of new version to production.
Move the Assistant pointer for the production Covid-19 bot to the new version (“<YY-MM-DD> Production”)
Backup the Covid-19 bot, with an export of the dialog skill to JSON — store the JSON file with name “<YYYY-MM-DD>_Production.json”
Move the Assistant pointer for the development Covid-19 bot to the tip version
Go back to step 1 and do it again……
Note that I have been non-specific about tickets/issues/tools to be using. I just trust that you are using some sort of change control — no matter how simple. You want to get your stakeholders in the habit of making change requests and then APPROVING those requests — just so we avoid any “Why did you do that?” situations. You can implement this on the IBM Cloud (a free version of GitHub hosted on the IBM Cloud), where you can do real lightweight change management, or you can use your existing change management tooling and infrastructure. It’s completely up to you.
Change Management for the Advanced User
The simple change management process outlined above will work for simple deployments, and is probably robust enough for a chatbot that is not expected to be deployed on a long term basis. What about change management for more established chatbots? Or for chatbots that are part of a larger system that is currently under some more formal type of change management? What can we do in those cases?
In those cases, and for users wishing for a more robust and formal change management or DevOps infrastructure, you will want to read A comparison of DevOps choices for IBM Watson Assistant byLeigh Williamson. Leigh is a peer of mine who has spent some time thinking about this, and more importantly, he has spent some time actually implementing these types of change management systems.
What’s Next?
So if you have been following this series of blog posts, you have deployed a longtail chatbot that answers Covid-19 questions. You have learned how to update that chatbot, and how to test and version control your changes. What’s left to do? At this point you know enough to be dangerous — it might be time to fill in some of those learning gaps. My blog posts tell you just what you need to know, but there are so many other Watson techniques and capabilities that you can use to make your end-user experience even better. Maybe you should check out some of the Watson Covid-19 specific learning resources that are out there.
In my earlier blog post, IBM Watson Fueled Chatbots — For Our Health, I talked about the costs and benefits of a chatbot, and showed you how a chatbot is within the reach of most organizations. I also walked you through a step-by-step guide of creating that initial chatbot. It’s not that hard to do, and the costs are minimal (or even zero if you take advantage of the IBM “Citizen Chatbot” campaign). Once you get that initial chatbot deployed, you have to update it. Given how fluid the current situation is in many locations, in terms of the guidance and response to the Covid-19 pandemic, you will be changing things OFTEN. So how do we do that? How do we maintain our chatbot?
In the following sections, I will briefly touch on how to do some basic things in Watson Assistant. You will want to find more complete guidance on all sorts of topics on our Watson Assistant landing pages, or even in the product documentation. I’ll try to make this as generic as possible since everyone will have slightly different implementations of things.
Getting Comfortable with Your Watson Chatbot
A good way to become familiar with your Watson Assistant implementation is to run some k-fold testing against it, and to look at and understand the results. The Python notebooks used for these can help you begin to understand what your chatbot is doing, how it is doing it, and gives you a foundation of test results to build on. I’ll cover this entire topic in a different post.
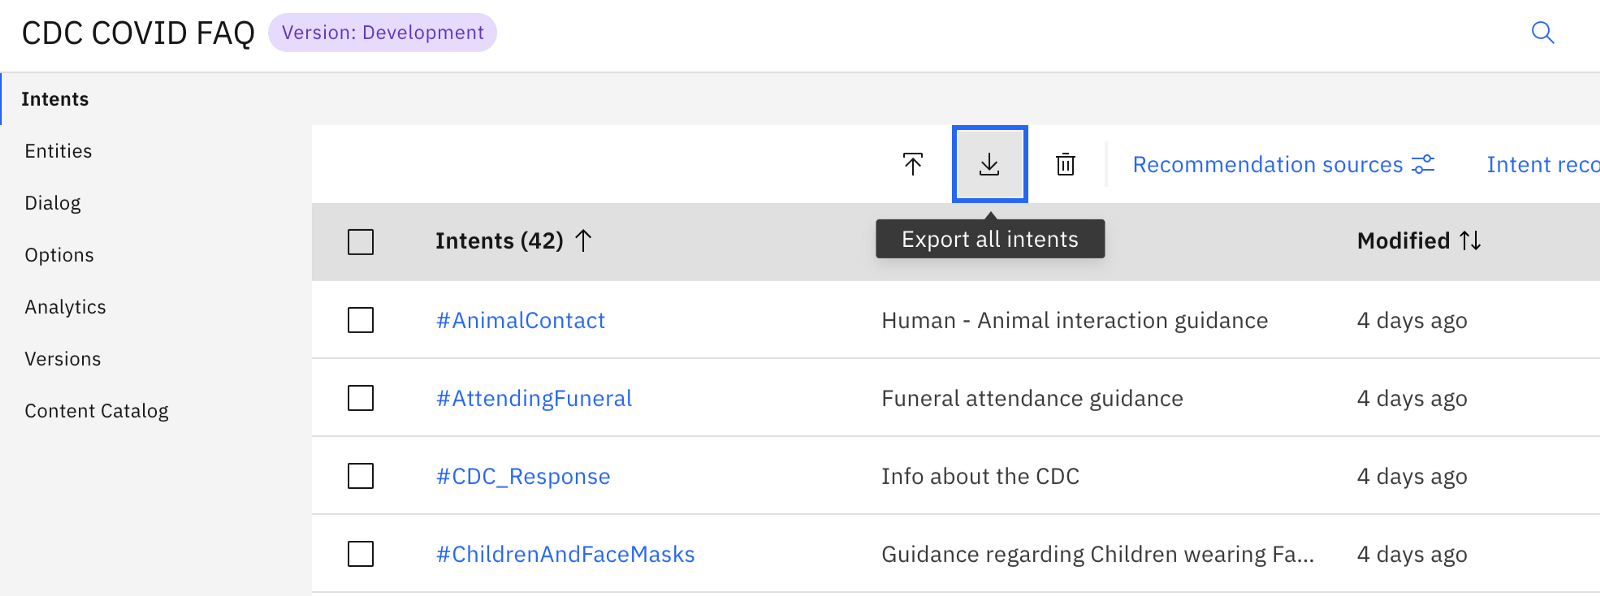
If you’re uncomfortable with this, you can just open up your Watson Assistant instance, and navigate into your Dialog skill. Once in there, go and look at your intents. Get familiar with the intents that you are looking for. You can export the training data for your intents. Just click on the “Export Intents” icon, and specify a CSV file to export to.
Exporting intents and training data to CSV file
Once that file has been exported, you can open the CSV file and see all of the training data and intents. Use this same approach to export your entities and their training data, so you can familiarize yourself with those as well.
I will often keep a list of intents and their general topics on a single sheet of paper, along with entities and their focus, on my desk. It will help me keep things straight when I go in and begin to make changes to the existing dialog nodes. The typical list might look something like this:
#AnimalContact — Human and animal interaction and guidelines #AttendingFuneral — info on funerals and attendance … @phone — US phone number pattern xxx-xxx-xxxx @school_type — high school, college, etc
Simple Changes to Specific Responses
Making simple changes to the “canned” responses that our chatbot has is pretty easy. It’s also one of the best ways to begin learning and getting comfortable with the Watson Assistant.
So what can we do? Let’s start at the beginning (always a great place to start!), and jump into our Watson Assistant dialog skill. Once in, click on the “Dialog” menu option, to display the dialog tree. Remember that the dialog tree nodes are evaluated for each user interaction, and they get evaluated starting from the top, and continuing to the bottom of the tree.
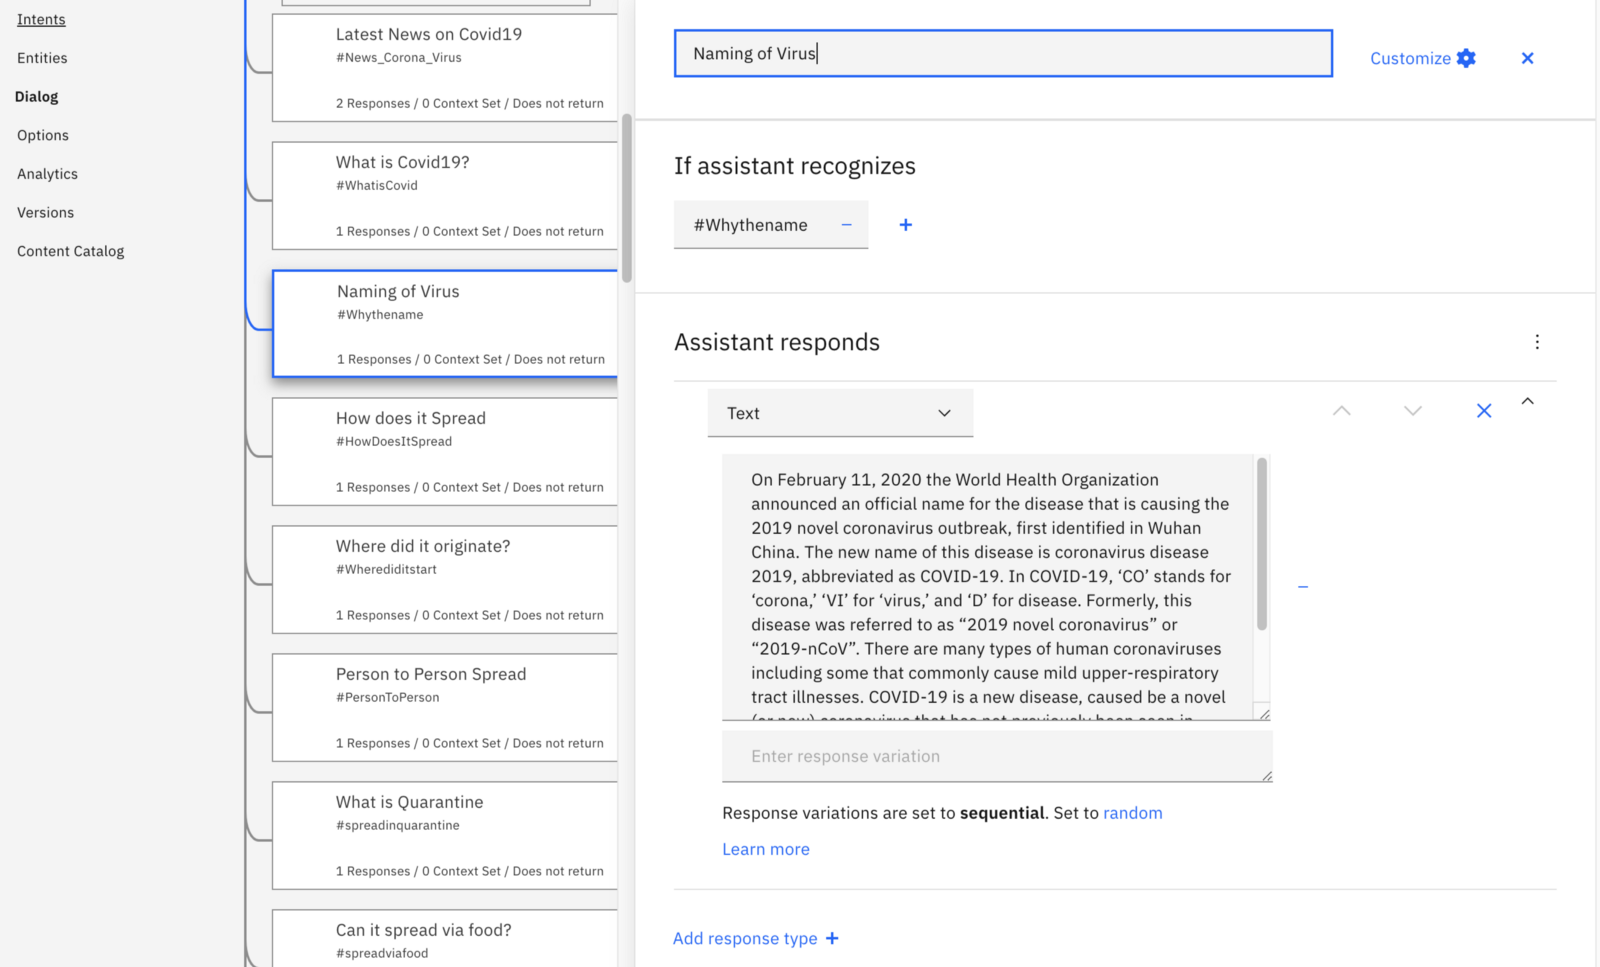
Take a look at the top node in your dialog tree. You can see that it has a name, followed by a section asking if the assistant recognizes some event. This is evaluating the user’s input, and looking at the intent and possibly the entities. The next section describes what happens if that particular condition is met. This section is the first place to focus — since most new chatbots are built with some “pre-built” intents, entities and dialog nodes. They also have text that may not match what you want to say, or how you want to say it. Take this example from my earlier IBM Watson Fueled Chatbots post. Look at the dialog node titled “Naming of virus”. There is a long description of the virus name and origination — you might want your response to be a bit more brief. Go ahead and change it. Then use the “Try it” button to open a dialog and test out your change. Type in “why is it named covid-19”, and you should be able to see what your modified response looks like.
When dealing with chatbots where you may have reused the data and settings from an earlier chatbot, it is often best to step through each node in a dialog tree, and assess the answer being given back to the end-user. Is this answer accurate for my end users? Does it fit in with the overall approach of my chatbot? Is the personality of my chatbot maintained? For some tips on effective chatbots (and the importance of chatbot personality), check out some of the articles on chatbot success factors and best practices, like Conversational Assistants and Quality with Watson Assistant — Revisited and Best Practices for Building and Maintaining a Chatbot.
Pro Tip: When writing out the text in a Dialog answer, use the markup language instead of HTML tags. Markup language will get processed properly by speech engines and integrations, while HTML tags will not always be properly processed. For example, use “you should **ALWAYS** wash your hands”, instead of, “you should <B>ALWAYS<\B> wash your hands”.
What Do Our Users Want?
The next steps to take in doing some ongoing improvements and changes to your chatbot involve making some changes to what you are answering. What types of questions are your end-users asking? What new conditions have come up, conditions that need to be addressed? Do we have changes to existing guidance offered by our chatbot?
In order to find the answers to these types of questions, we’ll take advantage of something that is unique to Watson Assistant Plus editions, and not available in the traditional Watson Assistant instances. We’ll utilize the analytics associated with the operation of our chatbot.
Go into your Watson Assistant instance, and then drop into the dialog skill that you are interested in. Then click on the “Analytics” option in the left-hand nav bar. You will see a screen that looks similar to the one shown below. It has a few graphs and some interesting looking data. What should we focus on?
Sample of the Analytics Overview Page
I tend to look in certain areas when I initially begin to look at chatbot performance.
Weak understanding — this number represents the user statements that our chatbot had a tough time figuring out. This is an obvious area to address.
Active Users — this number shows how well your solution is being adopted. It can also help you anticipate any increase in costs.
Top Intents and Top Entities — these two lists give you an idea of the areas that are being hardest hit with questions. You can see what people are asking about most often, and track how this might change over time.
When looking at the weak understanding box, click on the “View Logs” link. This will now show you logs of all of the conversations that your chatbot has had over some time period. The first view you see here is filtered — it is showing conversations where no entities were detected, and where no intent was detected. These are the questions that you had no answer for. When looking to improve your chatbot, this is typically a great place to start. See what kinds of questions are NOT being answered.
Gather a list of the legitimate questions that you want to address. Begin to organize these into rough groups. See if there are patterns. Some things that you should be looking for:
Do you see 5 to 10 different user inquiries that are asking the same basic question? That is a candidate for a new intent.
Do you see some new terms showing up a lot? Are particular slang terms beginning to emerge? These can be added to existing entities, or could be new entities that you want to identify.
Do you have any user questions that should have gone to a particular intent, but didn’t? Those user statements (commonly referred to as utterances) should be added to the training data.
What Types of Things Do We Deal With?
OK — so you have determined some areas and types of questions that you are not answering. How do we want to address these things?
The first thing to do is to improve your existing intents. You should add user utterances that were incorrectly classified, or went unclassified, to the training data for the intent that they should map to. The only exception to this is if you have more than 40 examples already in place for a particular intent. In that case, you should begin to remove similar utterances from the training data for that intent — for each one that you add, you should remove one. Otherwise, you may run into the problem of overfitting.
The next thing to do is to identify any new entities that you have. I suggest that you recognize and get these entities defined in your Watson Assistant dialog skill. After you have added these entities to your dialog skill, you should then go and begin to look at the individual dialog nodes that you already have, and determine if any of your responses can be modified to provide more targeted information based on these new entities.
Then it’s time to look at your potential new intents. Keep in mind that one or two utterances about something odd is NOT an intent. For any quality intent that you want to create, you should have at least 10 utterances. You should also check those utterances and make sure that they do not “collide” with, or replicate, utterances associated with other already existing intents.
The most simple scenario to handle with a dialog node is just directly answering a question linked to some intent. Here is an example:
Simple dialog node
At the top of the node you can see it’s name. The name is only important as a way for you to identify a node — what it does, what it answers. Make it brief, but descriptive. Next to the name is the “Customize” button, we won’t be using that for our simple dialog node example. Next is the trigger condition — in this example, we are triggering on “#Whythename”. The hashtag in front indicates that this is an intent (#intent), if there was an ampersand in front of the name then we would be referencing an entity (@entity). You can link intents and entities, as well as context variables, to further refine your dialog node actions. Since this is a simple dialog node, we’ll just trigger on a single intent. Finally, there is the response section. This response is just some text, but responses can take many forms. Try to keep your text responses simple and brief, you want to help your users, not bury them with details.
Now We Know Everything, Right?
Not really. You know how to do some of the easier things to improve your chatbot. At this point, you need to begin implementing some automated testing of your chatbot. This will help you get some objective measures of chatbot accuracy and performance, and will also give you some insight into areas where your chatbot could stand to improve.
So the next thing to do is to implement some automated testing and the application of some DevOps principles. We’ll save that for our next blog post.
With Covid-19 and all of the changes in our world, it’s interesting to think about how this impacts businesses all over the world. What can a chatbot do that is relevant in our new situation — with stay-at-home orders, social distancing, and the closing of non-essential businesses? Chatbots can do something that most local organizations need — communicate to your customers and users with a limited amount of staff, on a 24×7 basis. How many businesses are unable to staff call centers — wait times on many “help lines” can be up to two hours long. Chatbots enable you to “talk” with your customers and give them the information that they want, when they want it. Coupling your chatbot with some speech services can give you a solution that will work for your call center. A recent study by Forrester Consulting indicated that companies saw a benefit of over $5 per contained conversation handled by Watson Assistant. So what are you waiting for?
The Objections
A lot of companies and organizations would consider chatbots, and other AI technologies, but they feel like those technologies are too expensive. They might feel like they don’t have the expertise to build a chatbot on their own. They might have been right — in the past. This week, IBM announced it’s “Citizen Chatbot” campaign. This is targeted at government, healthcare, and other public agencies, and it provides for 90 days of FREE access to a fully functional chatbot with Covid19 information and guidance that is kept up-to-date with content from the CDC. It allows you to quickly and cheaply try chatbot technology to see how it can work for you.
That sounds wonderful, but a lot of my readers are not in those industries. Even though they are not in those industries, they still have a need to share Covid-19 information with their employees, business partners, and customers. Some of this information might be specific to the products and services that they provide. So if I can’t qualify for the “Citizen Chatbot” campaign, is there a way that I can do this for myself? How much effort would it be? How much would it cost?
The Simple Chatbot Solution
The most simple chatbot has three components: Watson Assistant, Watson Discovery, and your web page or mobile application.
Simplified chatbot architecture
Your Web page or mobile application will be the user interface for your chatbot. It is what the user interacts with. It handles login (if needed), sets the colors and presentation of your application, what the forms look like, and all of the things that your end-user sees.
The Watson Assistant piece will drive the “conversation” with the user. It determines what the user wants, and then provides the needed information or guidance. It handles the more simple questions, the frequently asked questions (FAQ’s) and the general questions that your end users may have.
When questions get too specific for the Watson Assistant to handle, they are passed off to the Watson Discovery service. The Discovery service will read (or ingest) a series of documents or web pages, and will then search through this knowledge base (commonly called a corpus) for answers to those more complex or complicated questions. These are often referred to as “long-tail” questions.
Mobile applications may use the Watson Speech services to provide voice inputs and outputs to your Watson Assistant service. These additional services would incur an additional cost when deployed, but would allow your chatbot to relieve some call center volume (which could be a huge cost savings for you). These are not necessary for a chatbot deployment, but represent the ability to add some capability to your chatbot.
The Simple Chatbot Costs
The costs for any solution can be difficult to fully quantify. What will the software development costs be? How much maintenance will need to be done? How many people have to be on call to support the solution? I don’t know your labor and development costs, so I leave the calculation of those costs to you. What I DO know, is the cost of the Watson services that a chatbot would use. So let’s look at our simple chatbot.
We use a single Watson PLUS instance. This single instance is going to cost $120 for each 1000 unique users every month. So if our bot is servicing 10,000 users in it’s first month, with some of them calling in multiple times, my monthly cost for the Watson Assistant service is going to be $1200.
We use a single Watson Discovery instance. We were careful when creating our Discovery instance, and created an x-small size instance, since our knowledge base is less than 50k documents. This size Discovery service will cost us $500/month.
We will use a single Speech-to-Text instance. These instances get billed based on usage — at a rate of $0.02 per minute. If your usage gets really high, this price per minute will drop (see the Speech-to-Text catalog page for service pricing). If we assume 5 minutes of speech per call (which is a loooong call…), we would have a bill of about $1000 for the month.
We will use a single Text-to-Speech instance. These instances get billed based on usage — at a rate of $0.02 per thousand characters. If your usage gets really high, this price per thousand characters will drop(see the Text-to-Speech catalog page for pricing info). If we assume 4000 characters of speech per call (which is a lot of talking in each call…), we would have a bill of about $800 for the month.
Note: IBM currently provides a Watson Assistant for Voice Interaction (WAVI) bundle of Watson Assistant (WA), Watson Discovery (WDS), Speech-to-Text (STT), Text-to-Speech (TTS), and Voice Gateway (VGW) for only $650 per month!! It provides 10K minutes of call time and 10K unique monthly web users.
With all of these costs added together, we see a total monthly cost of $3500 per month (Assistant’s $1200 added to $500 for Discovery, and $1000 and $800 for the Speech services) for handling these 10000 unique customers. That sounds like a lot of money, and it is. But now let’s look at the benefits that we will see.
I am going to make some assumptions, and use some “typical” numbers. I encourage you to do the math shown here, using your own numbers and costs, and see what your particular situation is. For this example, I will assume that we have a local call center that has been struggling to handle those 10,000 calls a month. We’ll assume that our chatbot can deflect only half of those calls (most customers report far more significant call deflection rates). So we figure that 5,000 calls a month are deflected. Let’s take that $5 per deflected conversation benefit from earlier, and we can cut it in half — to $2.50 — let’s be conservative in our benefit estimates. Multiplying those, we end up with a benefit of $12,500. Keep in mind that we are trying to be conservative with our benefits calculations. Now all of sudden our $3500 a month in costs doesn’t look so bad — in fact we have a net benefit of $9000. If we ramp up with more users per month, the costs, and benefits, increase on a fairly linear scale.
Note: Simple math with the WAVI bundle mentioned above also results in a fairly linear cost/benefits curve, with only $650 in costs against a benefit of $12,500 for those first 10000 users.
What Happens Now?
Many of you will be wanting to start building out your chatbot, but your organization will want to manage the effort and will want some sort of project plan. So let’s give them one — and begin to set expectations.
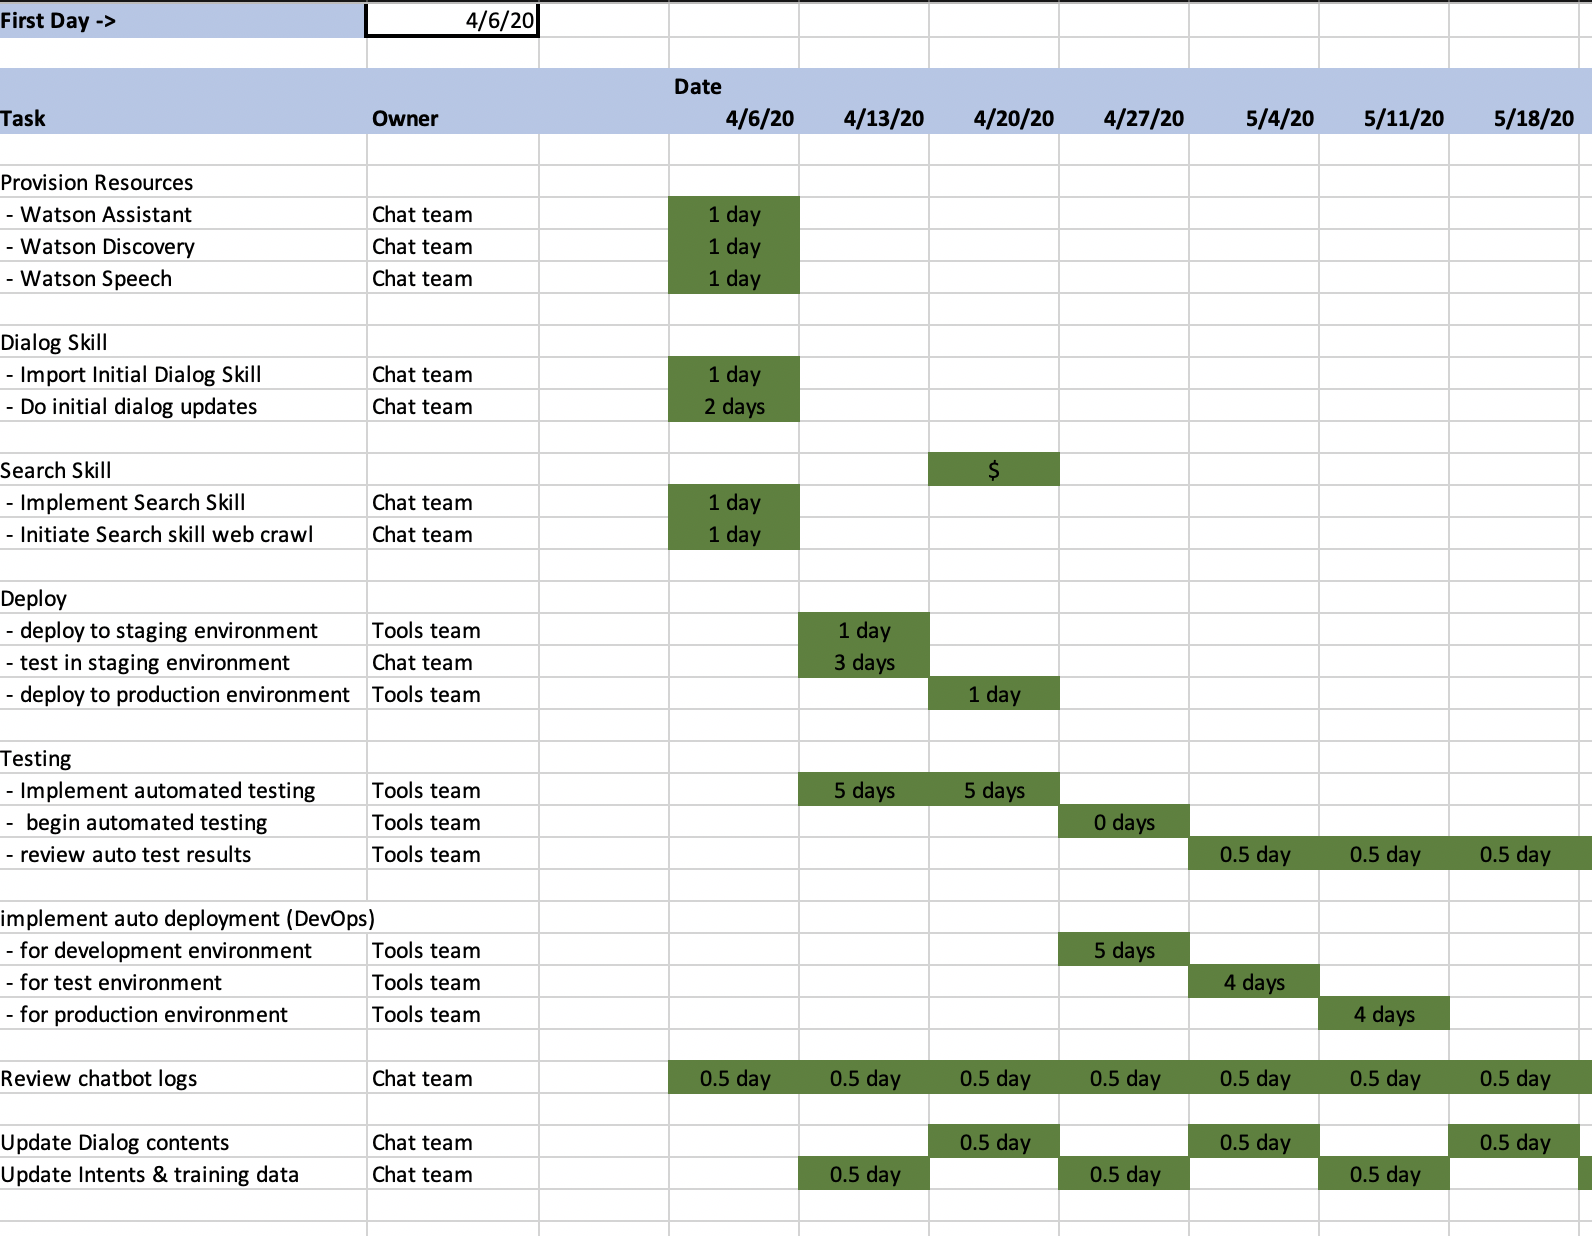
Sample Chatbot Project Plan
Looking at this simple chatbot project plan, you can see the high-level tasks involved in rolling out a chatbot. Provisioning resources is simple, and you can do all of your provisioning in an hour or less. Keep in mind that you should do this within a functional IBM Cloud account (see my post on Getting Started Right With the IBM Cloud).
You then will need to do some work on your dialog skill, first importing some pre-built intents, training data, and dialog flows. This is simple and should take less than an hour. Updating these to fit your particular situation will take a couple of days.
In parallel to your dialog work, you can create a search skill, and implement and execute the web crawling needed to populate your knowledge base for handling those “long tail” questions. All of these tasks can be done during the first few days of the project.
At this point you will need your existing development and operations teams to work together in getting the code to deploy your chatbot widget added to your homepage (or wherever you decide to host your chatbot). I strongly suggest doing this in some kind of staging or test environment. You can then test in this environment, and eventually deploy these changes to your production environments. All in less than a week.
After this initial deployment, you will have some longer workstreams to execute on, as well as some recurring work. For the recurring work, you’ll need to set up some iterative process for reviewing your chatbot results, and identifying improvements that need to be made. You will need to identify areas where things are changing, and where your chatbot needs to change.
The two longer workstreams that are needed to be done involve the automation of the testing process and the automation of the promotion/deployment processes. These are necessary if you want to make your chatbot a smoothly functioning and updating application. The processes and tools that you use here should be able to be used for ANY chatbot that your organization creates.
Let’s Get Ready for Building!
Before I launch into an overview of the steps that you need to take to build your very own Covid-19 Chatbot, you should be aware that there are now hundreds of “How to build your own Covid-19 chatbot” articles out there. Many of them are really good, and you might prefer their approach to what I have here. So I’ll list a few of them here — take a look at them and use the approach and the instructions that seem most straightforward to you.
Simple Covid-19 Chatbot — a great video that shows you how to do this in 4 minutes. He moves fast, so you’ll probably have to start/stop the video quite a bit, but it is simple and straightforward.
The first thing to do is to get a “functional account” in your domain. We touched on this earlier (my post on Getting Started Right With the IBM Cloud), but it is important. Make sure that your “owning” account is not tied to a single person — but is more of a service account that multiple people can administer.
Using that “functional account”, get yourself an IBM Cloud account. Some organizations may already have an IBM Cloud account, in which case, you’ll just need to make proper arrangements with the account owner.
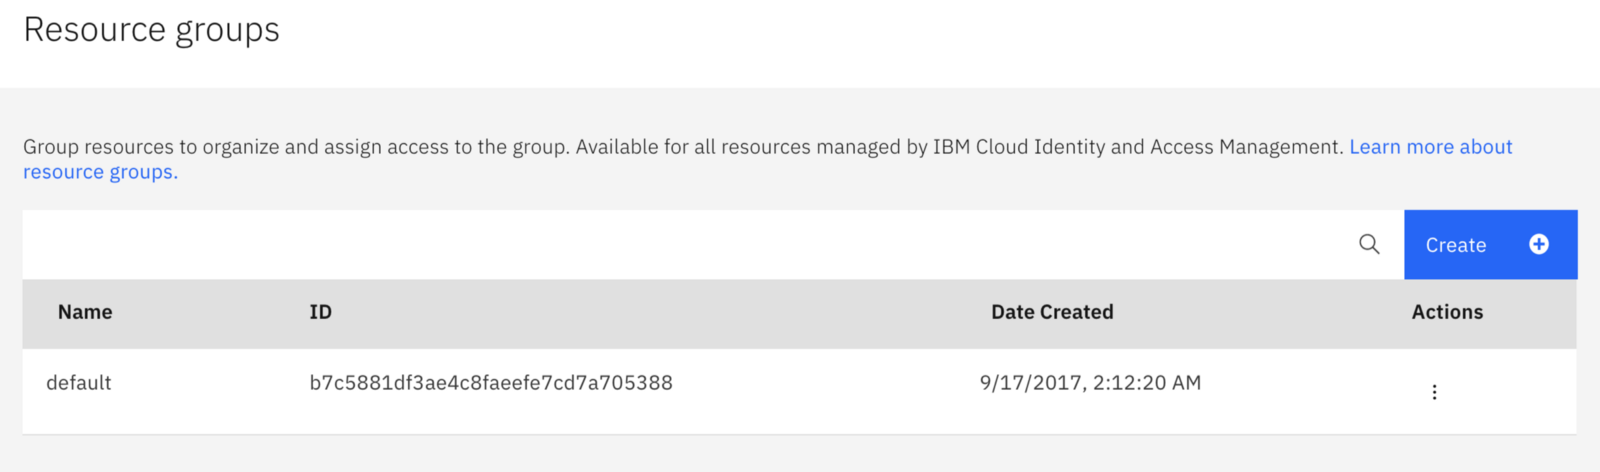
We need to do some basic housekeeping and setup of our Cloud account, so we can more easily manage access to resources. We’re going to want to create a new Resource Group and some Access Groups for our chatbot project. So first go to “Manage -> Account”, and then click on “Resource Groups”. You’ll see a list of resource groups (maybe just a default resource group — it depends on if this is a new or existing account). On this screen, we’re going to click the blue “Create” button to create a new Resource Group.
Resource Group creation
Call your new Resource Group something informative, like “Covid_Chatbot_RG”. Make sure to add the “_RG” at the end of your Resource Group name — it’s never to early to start using naming conventions.
Now we want to create some Access Groups — so we can easily add users to our project based on the role that they will play. So select “Manage -> Access (IAM)”, and then click on the “Access Groups” option. Now we’ll create three access groups, and name them with our resource group name, followed by the role, and then an “_AG” (which shows they are an access group). So for my three access groups, I created the following: “Covid_Chatbot_Admins_AG”, “Covid_Chatbot_Developers_AG”, and “Covid_Chatbot_Users_AG”. After creating these access groups, you should now see them on the “Access Groups” page.
The last thing to do with access groups is to set permissions for the access group. From the “Access Groups” page, click on the “Covid_Chatbot_Admins_AG” group (or your equivalent). Once the access group comes up, click on the “Access Policies” tab, and click the blue “Assign Access” button. This screen is where we will assign access for each of the Access Groups. Here is what you need to set for each group:
For the “Covid_Chatbot_Admins_AG” group:
Select “IAM Services”, “All Identity and Access enabled services”, “Resource group: Covid_Chatbot_RG”, and “All regions”. Check every box for platform access (Viewer, Operator, Editor, Administrator), service access (Reader, Writer, Manager), and resource group access (Viewer, Operator, Editor, Administrator). Note that you may need to click on the “View All” link to see all of your options for resource group access. Press the “Add” button at the bottom of the window.
Select “Account Management”, and “All Account Management services”. Check only two boxes for platform access (Viewer, Operator), and press the “Add” button at the bottom of the window.
Finally, press the blue “Assign” button in the right-hand pane, to assign these permissions to this access group.
For the “Covid_Chatbot_Developers_AG” group:
Select “IAM Services”, “All Identity and Access enabled services”, “Resource group: Covid_Chatbot_RG”, and “All regions”. Check two boxes for platform access (Viewer, Operator), and three boxes for service access (Reader, Writer, Manager). Press the “Add” button at the bottom of the window.
Select “Account Management”, and “Support Center”. Check three boxes for platform access (Viewer, Operator, Editor), and press the “Add” button at the bottom of the window.
Finally, press the blue “Assign” button in the right-hand pane, to assign these permissions to this access group.
For the “Covid_Chatbot_Users_AG” group:
Select “IAM Services”, “All Identity and Access enabled services”, “Resource group: Covid_Chatbot_RG”, and “All regions”. Check one box for platform access (Viewer), and one box for service access (Reader). Press the “Add” button at the bottom of the window.
Select “Account Management”, and “Support Center”. Check three boxes for platform access (Viewer, Operator, Editor), and press the “Add” button at the bottom of the window.
Finally, press the blue “Assign” button in the right-hand pane, to assign these permissions to this access group.
The last thing to do with access groups is to set your account into the admin access group. From the “Access Groups” page, click on the “Covid_Chatbot_Admins_AG” group (or your equivalent). Once the access group comes up, click on the “Users” tab, and click the blue “Add users” button. Now select your account, and then click the blue “Add to group” button.
Now we want to people invited to our project area. Select “Manage -> Access (IAM)”, and then click on the “Users” option. Now you can add the email addresses (IBM Cloud accounts) of the people you want to invite to your effort by clicking on the blue “Invite users” button. Add your users in groups, separated by commas, and assign each group of email addresses to a particular Access Group by clicking the blue “Add” link for the access group that you want assigned. This will give our new users access to the areas of the account that they need access to.
Now we’ll log in using your own account (in my case that might be tox@ibm.com), so we can check out these changes and get started with our chatbot.
Getting Services Created
The first steps in this project involve getting your Watson services deployed. We’re going to try to keep this as simple as possible — if you are looking for more complex deployment examples, see some of the links in the previous section, or reach out to me and I can probably point you in productive directions.
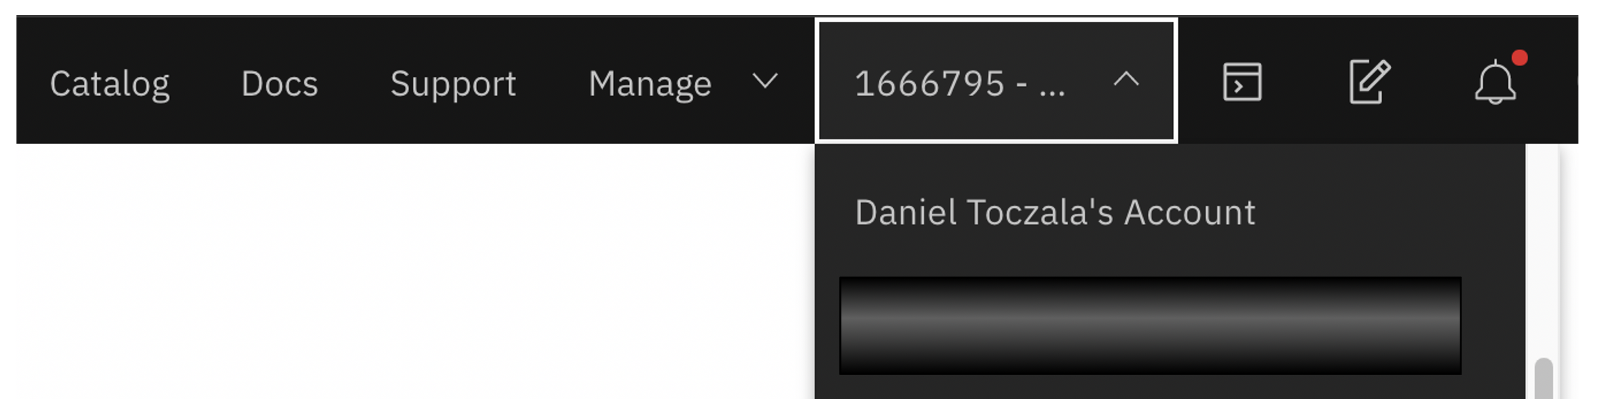
Now we want to make sure that we create these in the right place, so log into the IBM Cloud in your own account, and switch your context to be operating in the newly created account (where the chatbot is going to “live”). To make this context switch, go to your top bar, and look for your current context. Click on it and then choose the more general account (and not your personal account).
Switching your IBM Cloud context
Now let’s start creating some services. Click on the “Catalog” menu option, and then look at the AI offerings. You will want to choose the Watson Assistant. When you click on it, it will give you some options for creating your service. You will want to choose a geographic region (or data center) where you want to create your instance. Choose one that is relatively close to your physical location. Then select a plan (choose the Plus plan). Now you will need to select a service name (I have a naming convention, so mine is called “WA_Covid_Chatbot_Tox”) and a resource group (we’ll use the one we created, “Covid_Chatbot_RG”). Once this is all set, click the blue “Create” button in the right-hand pane to create your Watson Assistant instance.
While this instance provisions, let’s go and create the service that will handle our long-tail questions. Click on the “Catalog” menu option, and then look at the AI offerings. You will want to choose the Discovery service. When you click on it, it will give you some options for creating your service. You will want to choose a geographic region (or data center) where you want to create your instance. Choose the same one as before. Then select a plan (choose the Advanced plan). Now you will need to select a service name (I have a naming convention, so mine is called “WD_Covid_Chatbot_Tox”) and a resource group (we’ll use the one we created, “Covid_Chatbot_RG”). Once this is all set, click the blue “Create” button in the right-hand pane to create your Watson Discovery instance.
Begin Doing Some Assistant Work
So now we are ready to do some damage. Let’s go to our IBM Cloud dashboard, and take a look at our services/resources. Under the services section, you should see the two services that you created. Because you were smart and you used naming conventions, you know by the names what services these are. So you click on the name beginning with “WA” to open your Watson Assistant instance. Once it opens, click on the blue “Launch Watson Assistant” button. You’re now into the Watson Assistant tooling.
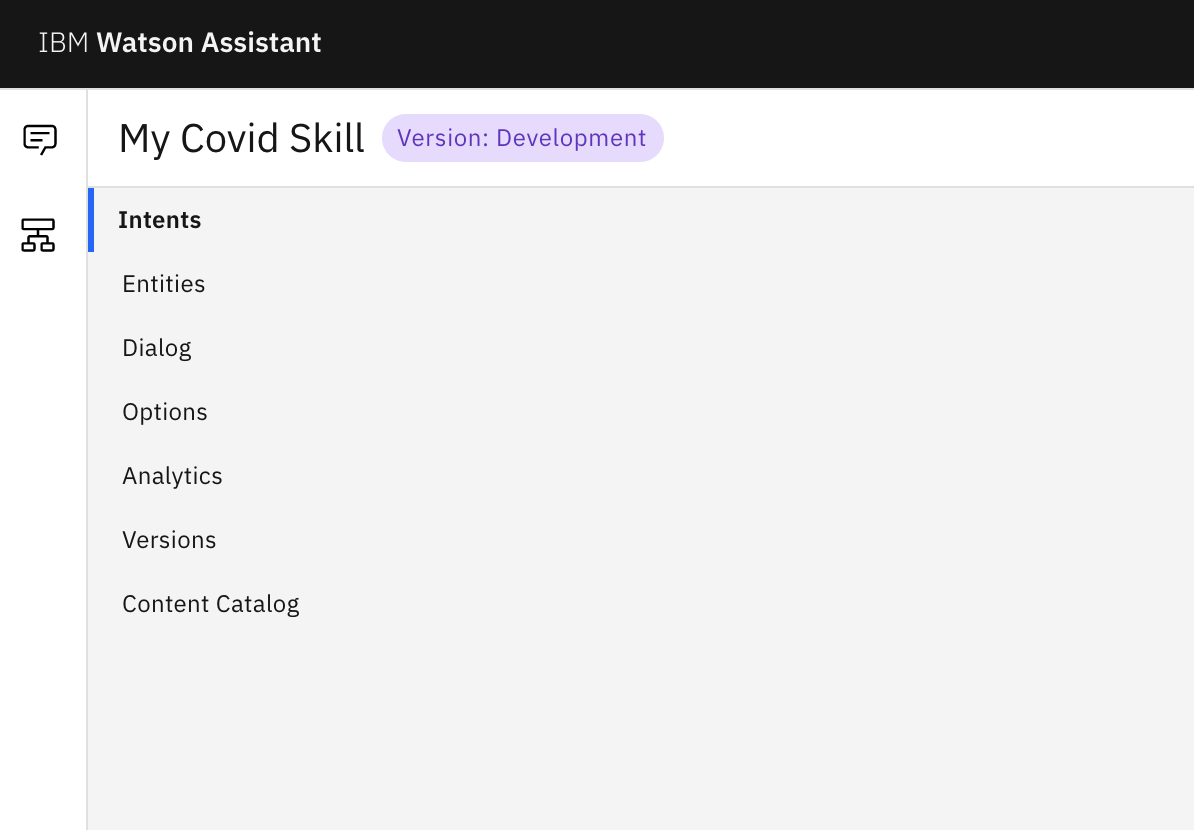
You now see a page with your Assistant displayed, it’s called “My first assistant”. You can see that it has one skill, under Dialog, called “My first skill”. Click on the second icon (called “Skills”) in the left-hand nav bar to pull up your list of skils. You should now see a list of all of your skills (you only have one right now). Click on the three dots in the upper right-hand corner of the skill, we need to rename this thing. Select “Rename”, and then rename your skill to “My Covid Skill” or something similar. Now just click on the main area of the box — and you are now in the skill tooling.
Starting off with a new skill
We’re starting from scratch, but we want to get this deployed quickly. So lets grab some work and data that has already be done for us. Click on the three dots in the upper right of the display, and select the “Import” option. We are going to import some JSON that represents a pre-built generic Covid-19 chatbot. You will want to use the fileCovid Json as the import file.
Note: You need to download this file to your local machine to make this work. If you’re not a GitHub person, then just click on the “Raw” button, and a new page will be displayed in your browser window. Once this is displayed, in your browser, just save the page by clicking “File -> Save Page as…”, and save it in JSON format. This content is from the “Call for Code” competition.
You can now poke around and take a look at the Intents that were added to your skill. Also take a look at the Entities, and the Dialog nodes. Don’t change anything — but look around at things. Take some time, after the import of new data your Watson Assistant needs to take some time to learn (called training) all of the new things that you just threw at it. After a couple of minutes, you can click the “Try it” button, and you should see a pane open up on the right-hand side of your browser. This is where you can test and check out your chatbot. Make sure that there is no flag that says that Watson is still training — and then try typing in some questions for your chatbot.
After that, you can now take a look at some of those dialog nodes. Click on one of them — and see how the responses are returned to the end user. Those conditions, the ones with the hashtag in front, are based on your intents. Those conditions with the @ in front of them are based on your entities. Using the detected intents and entities, we determine what the end user is asking about, and we supply an appropriate answer to them.
Let’s Look at the Long Tail
Now we need to configure our other service, the Watson Discovery service. Let’s go to our IBM Cloud dashboard, and take a look at our services/resources. Once again you smile a little, you were smart and you used naming conventions, so you click on the name beginning with “WD” to open your Watson Discovery instance. Once it opens, click on the blue “Launch Watson Discovery” button. You’re now going to see the Watson Discovery tooling.
The first thing that we need to do is to create our Discovery environment and choose a size for our Discovery instance (for more details on this, check out my blog post on Watson Discovery at the Size You Want). So in your Discovery window, find the environment icon (in the upper right corner), click on it, and then click on the blue “Create environment” button. The size of your environment is important — it determines the cost of your Discovery service. We wanted a quick chatbot, and we don’t anticipate a huge amount of documents needing to be stored, so we choose the “X-small” option, under the development tab. Once you find this option, click on the blue “Set up” button to begin setting up your environment, which will take a few minutes.
Once your environment is all set up, we’ll set up a simple collection and a simple web crawl to populate that document collection. You’ll notice that there is a button to “Connect a data source”. Press it. Next we’ll select “Web Crawl” as our data source. Now we get to add URL’s of the sites that we want to crawl for information. Let’s begin with these sites (you may want to add your own information sources):
As you add these URL’s, click the small gear icon that comes up with them as they are added. Then configure the number of hops for each data source. The web crawl will follow links, and links from those pages, and this is the depth of that link following that will be used. Once you have added your sources, click on the blue “Save & Synch” button. This will start your initial web crawl of data.
Your web crawl has now begun. On this screen, you can see the name of your new collection, which is just some random collection of characters. We want to change that. We’re going to call our new collection “CDC_Covid_info”, so click the small pencil icon next to that random name, and change it. So now we’ll just wait for those sites to get crawled and processed. This takes a little while, so we’ll just continue on and let it continue in parallel.
Note: Don’t panic if/when your Discovery web crawl begins to display numbers of documents that have failed. Documents fail to get ingested for a number of different reasons. Usually we just cast a wide net, and if some pages don’t get properly picked up, then we’ll find that information somewhere else.
Bringing it Together
Check your watch — how long has it been since we started? All we need to do now is connect these services, and then deploy our chatbot. Let’s start by connecting the services.
Go back into your Watson Assistant instance, and let’s look at the Assistants, which you can see by clicking on the top icon in the left-hand navigation pane. You can now see your only assistant — click on the rectangle to go into the assistant. Once inside, you can see your recently imported dialog skill. If you click on that box, you go to that familiar tool where you can modify your intents, entities, and dialog nodes. Let’s not do that right now, instead let’s look BELOW our dialog skill. There is a space there for a Search Skill. Let’s go and add one of those!
So press the blue “Add search skill” button, and you will be asked to name your search skill. Let’s name it the same thing as our document collection in Watson Discovery (“CDC_Covid_info”)— that way we won’t be confused or misled later — and hit the blue “Continue” button. On the next screen we need to choose our Watson Discovery instance (“WD_Covid_Chatbot_Tox”), and our web crawler collection of documents (“CDC_Covid_info”). Then press the blue “Configure” button, which will bring you to the last configuration screen. This screen allows you to tailor the information returned to your user. For now, we’ll just stick to the default values. So the last thing to do is to press the blue “Create” button to establish the collection as your source for answers to any “long tail” questions that your chatbot gets.
Now we need to make sure that we can get there. So let’s go into the Dialog skill for our chatbot. Scroll all of the way to the bottom, and find the dialog node called “Anything else”. Click on this node and open it up. If you look at it, it basically states that if it sees anything not covered in your intents, it will fire off a webhook. We don’t have time to do webhooks today (see some of the great materials on webhooks by Mitch Mason, Morgan Langlais, or this simple webhooks demo), so we’ll get rid of this. Click on the minus sign next to all but one of your options under the “Assistant Responds” section. For the last remaining option, click on the small gear, and configure the response. Under the “If assistant recognizes”, the value should be “anything_else”. Under the “Assistant Responds” area, select “Search skill”. Once you’ve done this (which tells the chatbot if it cannot detect an intent, to send the question to the search skill — or Discovery collection), press the blue “Save” button.
Testing and Releasing
Your chatbot is done — it might not feel that way, but it is. So let’s check it out. First we’ll want to do a basic check out of the answers to common user questions. So go back into your Watson Assistant instance, and let’s look at the Assistants. You know how to get there by now — if you don’t, then scroll back up and figure it out again.
Click on your assistant, and in the upper right of the window, you will see a section for integrations. In that section is a link that says “Add integration +”. Click on that link.
You have a few options here, but right now we’re just going to use the “Preview link” option. This is there so you can test out your chatbot with a private link, before you have to expose it to the world. So click that option, and just leave the default name for your preview link, and press the blue “Create” button. Once you do — a link will be generated that will allow you to see your chatbot in a web browser. Click on that link and ask some questions, check out how your chatbot is working.
When you are ready — and you should be ready pretty quickly — it’s time to deploy this chatbot. Let’s go back to the assistant page, and click on that link that says “Add integration +” again. This time we’ll add a “Web chat” integration. So click that option, and again we will just leave the default name for your name, and press the blue “Create” button. Now we see some options to customize your UI, and as you change these options you can see a sample window to the right of what your chatbot will look like. Once you are done playing with the title bar name and the colors that you want, you can just copy the code in the following section, and have it added to the web page where you want your chatbot. Simple as that.
Now What?
Now you need to update this chatbot. You should learn more about how Intents work, how Entities can be used to help make your chatbot responses more targeted, and how Dialog nodes work. I like the Watson Assistant landing page (full disclosure — I help curate this page) for links to more learning resources. You can also take some of the online courses offered if you prefer to learn that way. The BEST way to learn is by doing. Make changes to your chatbot and see how it reacts. Don’t be scared — if you ever want to try something out, just duplicate your skill first, and then work on the copy. Then you always have the original to go back to if you really screw something up.
You will want to make sure that your responses haven’t needed to change due to changing conditions, and you may want to add new intents for new situations that your users might ask about.
If you’re really stuck, or just overwhelmed with the possibilities, you can always reach out to me. I can help you talk through your options, and I can give you some good advice to move forward with. Just reach out to me at dtoczala@us.ibm.com.
Note: I updated the original Conversational Assistants and Quality blog post in February 2020 to add a link to a much better testing notebook that I discovered, and to do a slight rewrite of that section. This blog post is a complete update to that original post – and it restates a lot of what I highlighted in the original post. The BIG difference is the new Python testing notebook – which is located out on GitHub, as CSM-Bot-Kfold-Test.
In early February of 2020 I was informed of this great blog post and Python notebook, on How to Design the Training Data for an AI Assistant. I REALLY liked this Python notebook MUCH better than my original k-fold notebook (from August of 2019). The other nice thing is that you can discover this Python notebook in the catalog in Watson Studio, and just apply it and have it added to your Watson Studio project. The only big difference with this notebook is that you need to have your testing data in a separate CSV file – it doesn’t break up “folds” based on your training data. It didn’t even do folds – just straight training and testing data.
I wasn’t a big fan of that approach, I liked my basic approach of pointing at only a Watson Assistant instance, and using all of the training data in a series of k-fold tests. Nobody wants to manage this data, that data, this file, that file….. it’s an opportunity to screw things up. Most of my customers are NOT AI experts, they just want a suite of tools that they can point at their chatbot engine that will allow them to do some automated testing of their chatbot. I have also noticed that many will use ALL of their training data, and not hold back some as test data. Doing k-fold testing using all of the training data in an existing Watson Assistant instance addresses this.
However, I really liked some of the analysis that they had done of the training data, and some of the other insights that they provided. So I decided to dive in and spend a little time merging the best of both of these approaches together. First, let’s start with some basic “rules” that you should be following if you are developing a chatbot.
Getting Started with Your Conversational Assistant
Back in July of 2019, I was working with a group of like-minded people inside of IBM, and we decided to create an IBM internal chatbot that would capture a lot of the “institutional knowledge” that some of our more experienced members knew, but that didn’t seem to be captured anywhere. We wanted our newer team members to be as effective as our more seasoned members.
We spent a week or two coming to a common vision for our chatbot. We also mapped out a “growth path” for our chatbot, and we agreed on our roles. I cannot begin to stress how important this is – Best Practice #1 – Know the scope and growth path for your chatbot. We had a good roadmap for the growth of our chatbot. We mapped out the scope for a pilot, where we wanted to be to release it to our end users, and a couple of additional capabilities that we wanted to add on once we got it deployed.
My boss graciously agreed to be our business sponsor – his
role is to constantly question our work and our approach. “Is this the most cost-effective way to do
this?”, and, “Does that add any value to your chatbot?”, are a couple of the
questions he constantly challenges us with.
As a technical guy, it’s important to have someone dragging us back to
reality – it’s easy to get focused on the technology and lose sight of the end
goal.
Our team of “developers” also got a feel for the roles we would play. I focused on the overall view and dove deeper on technical issues, some of my co-workers served primarily as testers, some as knowledge experts (SME’s), and others as served as UI specialists, focusing on the flow of conversation. This helped us coordinate our work, and it turned out to be quite important – Best Practice #2 – Know your roles – have technical people, developers, SME’s, architects, and end users represented. If you don’t have people in these roles, get them.
Starting Out – Building A Work Pipeline
As we started, we came together and worked in a spreadsheet
(!?!), gathering the basic questions that we anticipated our chatbot being able
to answer. We cast a pretty wide net
looking for “sample” questions to get us kickstarted. If you are doing something “new”, you’ll have
to come up with these utterances yourself.
If you’re covering something that already exists, there should be logs
of end user questions that you can use to jumpstart this phase of your project.
Next, we wanted to make sure that we had an orderly development environment. Since our chatbot was strictly for internal deployment, we didn’t have to worry too much about the separation of environments, so we could use the versioning capabilities of Watson Assistant. Since our chatbot was going to be deployed on Slack, we were able to deploy our “development” version on Slack, and also deploy our “test” and “production” versions on Slack as well. These are all tracked on the Versions tab of the Watson Assistant Skill UI. This gives us the ability to “promote” tested versions of our skill to different environments. All of this allowed us to have a stable environment that we could work and test in – which leads us to Best Practice #3 – Have a solid dev/test/prod environment set up for your Conversational assistant or chatbot.
How Are We Doing? – K- Fold Testing
As we started out, we began by pulling things together and seeing how our conversational assistant was doing in real-time, using the “Try It” button in the upper right-hand corner of the Watson Assistant skills screen. Our results were hit and miss at first, so we knew that we needed a good way to test out our assistant.
In February of 2020 I was informed of this great blog post and Python notebook, on How to Design the Training Data for an AI Assistant. I liked this Python notebook MUCH better than my old K-fold notebook, but I liked my approach better. So I went to work combining the best of both worlds into a new Python notebook. My new Python notebook does this – and provides some great insight into your chatbot. Go and find it on GitHub, where it is stored as CSM-Bot-Kfold-Test.
This highlights our next best practice – Best Practice #4 – Automate Your AI Testing Strategy.
Using Feedback
As we let our automated training process take hold, we noted that our results were not what we had hoped, and that updating things was difficult. We also learned that taking time each week to review our Watson Assistant logs was time well spent.
It was quite difficult to add new scope to our conversation agent, so we looked at our intents and entities again. After some in-depth discussions, we decided to try a slightly different focus on what we considered intents. It allowed us to make better use of the entities that we detected, and it gave us the ability to construct a more easily maintained dialog tree. We needed to change the way that we were thinking about intents and entities.
All of this brings us to our next piece of wisdom – Best Practice #5 – Be Open-Minded About Your Intents and Entities. All too often I see teams fall into one of either two traps.
Trap 1 – they try to tailor their intents to the answers that they want to give. If you find yourself with intents like, “how_to_change_password” and “how_to_change_username”, then you might be describing answers, and not necessarily describing intents.
Trap 2 – teams try to have very focused intents. This leads in an explosion of intents, and a subsequent explosion of dialog nodes. If you find yourself with intents like, “change_password_mobile”, “change_password_web”, “change_password_voice”, then you have probably fallen into this trap.
We found that by having more general intents, and then using context variables and entities to specify things with more detail, that we have been able to keep our intents relatively well managed, our dialog trees smaller and better organized, and our entire project is much easier to maintain. So, if our intent was “find_person”, then we will use context variables and entities to determine what products and roles the person should have. Someone asking, “How do I find the program manager for Watson Assistant?”, would return an intent of “find_person”, with entities detected for “program manager” and “Watson Assistant”. In this way, we can add additional scope without adding intents, but only by adding some entities and one dialog node.
Why K-Fold Isn’t Enough
One thing that we realized early on was that our k-fold
results were just one aspect of the “quality” of our conversational
assistant. They helped quantify how well
we were able to identify user intents, but they didn’t do a lot for our
detection of entities or the overall quality of our assistant. We found that our k-fold testing told us when
we needed to provide additional training examples for our classifier, and this
feedback worked well.
We also found that the “quality” of our assistant improved
when we gave it some personality. We
provided some random humorous responses to intents around the origin of the
assistant, or more general questions like, “How are you doing today?”. The more of a personality that we injected
into our assistant, the more authentic and “smooth” our interactions with it
began to feel. This leads us to Best
Practice #6 – Inject Some Personality Into Your Assistant.
Some materials from IBM will break this down into greater
detail, insisting that you pay attention to tone, personality, chit-chat and
proactivity. I like to keep it simple –
it’s all part of the personality that your solution has. I usually think of a “person” that my
solution is – say a 32-year old male from Detroit, who went to college at
Michigan, who loves sports and muscle cars, named Bob. Or maybe a 24-year-old recent college
graduate named Cindy who grew up in a small town in Ohio, who has dreams of
becoming an entrepreneur in the health care industry someday. This helps me be consistent with the
personality of my solution.
We also noticed that we often needed to rework our Dialog tree and the responses that we were specifying. We used the Analytics tab in the skill we were developing. On that Analytics tab, we would often review individual user conversations and see how our skill was handling user interactions. This led us to make changes to the wording that we used, as well as to the things we were looking for (in terms of entities) and what we were storing (in terms of conversation context). Very small changes can result in a big change in the end-user perception. Something as simple as using contractions (like “it’s” instead of “it is”), will result in a more informal conversation style.
The Analytics tab in Watson Assistant is interesting. It provides a wealth of information that you
can download and analyze. Our effort was
small, so we didn’t automate this analysis, but many teams DO automate the
collection and analysis of Watson Assistant logs. In our case, we just spent some time each
week reviewing the logs and looking for “holes” in our assistant (questions and
topics that our users needed answers for that we did not address), and trends
in our data. It has helped guide our
evolution of this solution.
Summary
This blog post identifies some best practices for developing
a chatbot with IBM Watson Assistant – but these apply to ANY chatbot
development, regardless of technology.
Best
Practice #1 – Know the scope and growth path for your chatbot
Best
Practice #2 – Know your roles – have technical people, developers, SME’s,
architects, and end users represented
Best
Practice #3 – Have a solid dev/test/prod environment set up for your
Conversational assistant or chatbot
Best
Practice #4 – Automate Your AI Testing Strategy
Best
Practice #5 – Be Open Minded About Your Intents and Entities
Best
Practice #6 – Inject Some Personality Into Your Assistant
Now that you have the benefit of some experience in the
development of a conversational assistant, take some time to dig in and begin
building a solution that will make your life easier and more productive.
Note: I updated this article on March 3, 2021 to update the links in the article. One of my peers, Dan Anders, had passed this article along to a customer and informed me that all of the links in this article were broken. Thank you for the feedback Dan!
I like to answer customer questions on the IBM Cloud, and about using Watson services on the IBM Cloud. Sometimes I know the answer… sometimes I have to go and find the answer… and sometimes I create the answer. As I encounter interesting questions, I like to share my solutions and answers on this blog – so that way I am able to help other people who may be encountering the same issues.
Recently I have been seeing a lot of questions about how authentication on the IBM Cloud works, and what the “best practices” around authentication are. It’s a large topic, and I cannot cover it completely in this blog post, but hopefully, I can cover it to a depth that will help you make decisions about how you want to structure your IBM Cloud/Watson application.
Getting Into The IBM Cloud
You get into the IBM Cloud using your own username/password to authenticate. You might even use two-factor authentication to get in. The access to all of the services and accounts on the IBM Cloud is controlled by the IBM Cloud Identity and Access Management (IAM) service. This service validates your identity and then assigns your access and permissions based on that identity.
When an application attempts to access resources on the IBM Cloud, it too needs to have it’s identity validated. Most IBM Cloud users will create either a service account (with its own login, password, and credentials) or will create some specific service credentials for every cloud service.
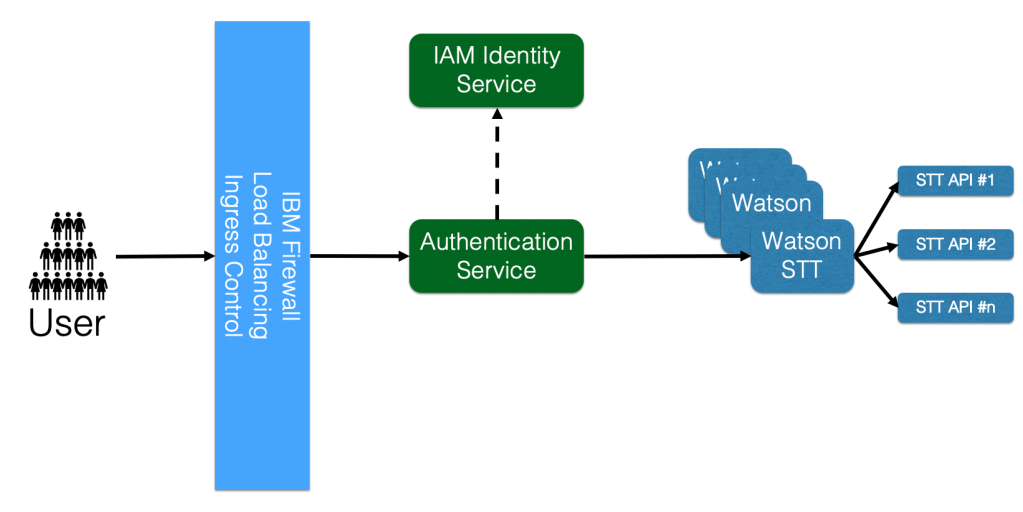
So the first step is to have your application authenticate itself, with some sort of credentials. To do this you will make your API call to the API endpoint that you are attempting to access. This call will go through the IBM firewall, which takes care of traffic routing, ingress, load balancing, and some other “big picture” types of things. Your request is then routed to the authentication service. This service will attempt to authenticate your request.
Basic Watson Service Request Flow
It is at this point that things get interesting for an application developer. You must choose from one of two paths:
You can give the authentication mechanism an API Key. The authentication service will then validate the API Key. It does this by calling the IAM Identity service. Once you have been authenticated, your request is passed along to the appropriate Watson service instance.
You can give the authentication mechanism an API Token. To get this API Token, you will first need to call the IAM Identity service, give it your API Key, and ask for an API Token. You can then make your call and give the authentication mechanism this API Token.
So why would you want to take approach #2? You want to take approach #2 as much as possible because when you authenticate via an API Token, you do not make an additional call to the IAM service when authenticating. These API Tokens are good for between 30 to 60 minutes, depending on your service.
If all of this seems a bit confusing, and you would like to see some more detail about this whole process, check out the step-by-step documentation on Invoking IBM Cloud Services APIs.
How Much Do I Save?
Let’s look at a simple example. If your application will make 1000 calls to the Watson service in a typical hour of usage. If you just use the API Key approach, you will make 1000 additional calls to the IAM service. Each call will the API Key will require the authentication service to make a request to the IAM service.
If you decide to use the API Token method, you will make an extra call to the IAM service to get your token, and then you will make your initial service call. This is 1 additional call to the IBM Cloud. So in a typical hour, this will save you 999 service calls within the IBM Cloud.
The savings here for a single call to a service may be difficult to measure and probably would go unnoticed by an end-user. But during periods of high traffic and high load, this reduction in traffic and load will make your application much more robust, responsive and resilient.
Why even bother with the API Key approach? It is useful for testing scenarios and for times when you just want to issue curl calls by hand, directly to the API. In these cases, it is much nicer to just do the call once, rather than having to get a token and then use the resulting token (which can be large).
How Do I Do It?
Set up a small section of code to request your API Token, and then save that token and insert it into every API call made to services on the IBM Cloud. You’ll then need to decide on how you want to handle renewing your token, since every token is only good for 30 to 60 minutes (depending on the service).
You can either set a timer and wake up to renew your token before the previous token expires. The other option is to just handle authentication errors in your application by refreshing your token and trying to execute your request again with the new token.
Note: I updated this blog post in February 2020 to add a link to a much better testing notebook that I discovered, and to do a slight rewrite of that section.
Recently my team inside of IBM decided that we needed to
capture some of the “institutional knowledge” that some of our more experienced
members knew, but that didn’t seem to be captured anywhere so our newer team
members could be as effective as our more seasoned members. We also wanted an excuse to get our hands
dirty with our own technology, some of us had been focused on some of the other
Watson technologies and needed to get reintroduced to the Watson Assistant
since the migration to the “skills based” UI.
I went looking for something good about developing a chatbot
(or conversational assistant), with Watson Assistant, and some good lessons
learned. I found some good information,
but not one spot with the kind of experience and tips that I was looking
for. So I thought it might be good to
capture it in my own blog post.
Getting Started with Your Conversational Assistant
We spent a week or two coming to a common vision for our chatbot. We also mapped out a “growth path” for our chatbot, and we agreed on our roles. I cannot begin to stress how important this is – Best Practice #1 – Know the scope and growth path for your chatbot. We had a good roadmap for the growth of our chatbot. We mapped out the scope for a pilot, where we wanted to be to release it to our end users, and a couple of additional capabilities that we wanted to add on once we got it deployed.
My boss graciously agreed to be our business sponsor – his
role is to constantly question our work and our approach. “Is this the most cost-effective way to do
this?”, and, “Does that add any value to your chatbot?”, are a couple of the
questions he constantly challenges us with.
As a technical guy, it’s important to have someone dragging us back to
reality – it’s easy to get focused on the technology and lose sight of the end
goal.
Our team of “developers” also got a feel for the roles we would play. I focused on the overall view and dove deeper on technical issues, some of my co-workers served primarily as testers, some as knowledge experts (SME’s), and others as served as UI specialists, focusing on the flow of conversation. This helped us coordinate our work, and it turned out to be quite important – Best Practice #2 – Know your roles – have technical people, developers, SME’s, architects, and end users represented. If you don’t have people in these roles, get them.
Starting Out – Building A Work Pipeline
As we started, we came together and worked in a spreadsheet
(!?!), gathering the basic questions that we anticipated our chatbot being able
to answer. We cast a pretty wide net
looking for “sample” questions to get us kickstarted. If you are doing something “new”, you’ll have
to come up with these utterances yourself.
If you’re covering something that already exists, there should be logs
of end user questions that you can use to jumpstart this phase of your project.
Next, we wanted to make sure that we had an orderly development environment. Since our chatbot was strictly for internal deployment, we didn’t have to worry too much about the separation of environments, so we could use the versioning capabilities of Watson Assistant. Since our chatbot was going to be deployed on Slack, we were able to deploy our “development” version on Slack, and also deploy our “test” and “production” versions on Slack as well. These are all tracked on the Versions tab of the Watson Assistant Skill UI. This gives us the ability to “promote” tested versions of our skill to different environments. All of this allowed us to have a stable environment that we could work and test in – which leads us to Best Practice #3 – Have a solid dev/test/prod environment set up for your Conversational assistant or chatbot.
How Are We Doing? – K- Fold Testing
As we started out, we began by pulling things together and seeing how our conversational assistant was doing in real-time, using the “Try It” button in the upper right-hand corner of the Watson Assistant skills screen. Our results were hit and miss at first, so we knew that we needed a good way to test out our assistant.
In February of 2020 I was informed of this great blog post and Python notebook, on How to Design the Training Data for an AI Assistant. I really like this Python notebook MUCH better than my own K-fold notebook mentioned above. The other nice thing is that you can discover this Python notebook in the catalog in Watson Studio, and just apply it and have it added to your Watson Studio project. The only big difference with this notebook is that you need to have your testing data in a separate CSV file – it doesn’t break up “folds” based on your training data. This highlights Best Practice #4 – Automate Your AI Testing Strategy.
After all of this was in place, our team fell into a
predictable rhythm of work and review of our work. Since this was a side project for all of us,
some of us contributed some weeks, and didn’t contribute on other weeks. We were a small team of people (less than
10), so it was easy to have our team manage itself.
Using Feedback
As we let our automated training process take hold, we noted that our results were not what we had hoped, and that updating things was difficult. We also learned that taking time each week to review our Watson Assistant logs was time well spent.
It was quite difficult to add new scope to our conversation agent, so we looked at our intents and entities again. After some in-depth discussions, we decided to try a slightly different focus on what we considered intents. It allowed us to make better use of the entities that we detected, and it gave us the ability to construct a more easily maintained dialog tree. We needed to change the way that we were thinking about intents and entities.
All of this brings us to our next piece of wisdom – Best Practice #5 – Be Open-Minded About Your Intents and Entities. All too often I see teams fall into one of either two traps. Trap 1 – they try to tailor their intents to the answers that they want to give. If you find yourself with intents like, “how_to_change_password” and “how_to_change_username”, then you might be describing answers, and not necessarily describing intents. Trap 2 – teams try to have very focused intents. This leads in an explosion of intents, and a subsequent explosion of dialog nodes. If you find yourself with intents like, “change_password_mobile”, “change_password_web”, “change_password_voice”, then you have probably fallen into this trap.
We found that by having more general intents, and then using context variables and entities to specify things with more detail, that we have been able to keep our intents relatively well managed, our dialog trees smaller and better organized, and our entire project is much easier to maintain. So, if our intent was “find_person”, then we will use context variables and entities to determine what products and roles the person should have. Someone asking, “How do I find the program manager for Watson Assistant?”, would return an intent of “find_person”, with entities detected for “program manager” and “Watson Assistant”. In this way, we can add additional scope without adding intents, but only by adding some entities and one dialog node.
Why K-Fold Isn’t Enough
One thing that we realized early on was that our k-fold
results were just one aspect of the “quality” of our conversational
assistant. They helped quantify how well
we were able to identify user intents, but they didn’t do a lot for our
detection of entities or the overall quality of our assistant. We found that our k-fold testing told us when
we needed to provide additional training examples for our classifier, and this
feedback worked well.
We also found that the “quality” of our assistant improved
when we gave it some personality. We
provided some random humorous responses to intents around the origin of the
assistant, or more general questions like, “How are you doing today?”. The more of a personality that we injected
into our assistant, the more authentic and “smooth” our interactions with it
began to feel. This leads us to Best
Practice #6 – Inject Some Personality Into Your Assistant.
Some materials from IBM will break this down into greater
detail, insisting that you pay attention to tone, personality, chit-chat and
proactivity. I like to keep it simple –
it’s all part of the personality that your solution has. I usually think of a “person” that my
solution is – say a 32-year old male from Detroit, who went to college at
Michigan, who loves sports and muscle cars, named Bob. Or maybe a 24-year-old recent college
graduate named Cindy who grew up in a small town in Ohio, who has dreams of
becoming an entrepreneur in the health care industry someday. This helps me be consistent with the
personality of my solution.
We also noticed that we often needed to rework our Dialog tree and the responses that we were specifying. We used the Analytics tab in the skill we were developing. On that Analytics tab, we would often review individual user conversations and see how our skill was handling user interactions. This led us to make changes to the wording that we used, as well as to the things we were looking for (in terms of entities) and what we were storing (in terms of conversation context). Very small changes can result in a big change in the end-user perception. Something as simple as using contractions (like “it’s” instead of “it is”), will result in a more informal conversation style.
The Analytics tab in Watson Assistant is interesting. It provides a wealth of information that you
can download and analyze. Our effort was
small, so we didn’t automate this analysis, but many teams DO automate the
collection and analysis of Watson Assistant logs. In our case, we just spent some time each
week reviewing the logs and looking for “holes” in our assistant (questions and
topics that our users needed answers for that we did not address), and trends
in our data. It has helped guide our
evolution of this solution.
Summary
This blog post identifies some best practices for developing
a chatbot with IBM Watson Assistant – but these apply to ANY chatbot
development, regardless of technology.
Best
Practice #1 – Know the scope and growth path for your chatbot
Best
Practice #2 – Know your roles – have technical people, developers, SME’s,
architects, and end users represented
Best
Practice #3 – Have a solid dev/test/prod environment set up for your
Conversational assistant or chatbot
Best
Practice #4 – Automate Your AI Testing Strategy
Best
Practice #5 – Be Open Minded About Your Intents and Entities
Best
Practice #6 – Inject Some Personality Into Your Assistant
Now that you have the benefit of some experience in the
development of a conversational assistant, take some time to dig in and begin
building a solution that will make your life easier and more productive.
Note: This is the first blog in a series of blogs that I am co-authoring with Paula Williams, as part of an “I have an Issue…” series on the IBM Cloud. These blog posts will cover how to deal with common issues and roadblocks for users of the IBM Cloud. Check out her post on “What the Heck is a CSM?“
I like helping my IBM Cloud customers, and I like dealing with the technology. Every new technology (and even established technologies) have a learning curve. My goal in writing this series of articles is to help you more quickly conquer that learning curve with respect to the IBM Cloud.
Typical Issues That People See
Some typical issues that users experience when working with the IBM Cloud will often be with respect to their services. These could be one of the Watson services (like Watson Conversation or Watson Discovery), or maybe Cloud Object Storage, or a DB2 or Mongo database. The issues that people will typically experience fall into one of two categories:
I’ve Created Something That I Cannot See
These situations have you going out and creating an instance
of a service, but now you just can’t seem to figure out how to find it or how
to get to it. It’s almost as if we have
decided to hide it on you.
In these situations, it is best to first figure out WHERE you are on the IBM Cloud. Look in the upper right corner of your browser window. As soon as you log into the IBM Cloud, you’ll see something like this:
Finding the area you are working in on the IBM Cloud
That text in that small black block tells you WHERE you are. It tells you the account that you are operating in. Clicking on this box you can CHANGE where you are looking. Confused yet? Maybe we should step back a bit….
You have an ACCOUNT and IDENTITY on the IBM Cloud. Your IDENTITY from an IBM perspective is
typically an email address, which is also your IBM ID (for our example let’s
assume that mine is tox@acme.com). It has the same username/password as your IBM
ID (which you might use for things on ibm.com).
You might even have a Federated ID, where we use your company email
address/identity and your company authentication mechanisms. Some things to remember when looking at your
IBM ID:
Just because you have an IBM ID, doesn’t mean that
you have an IBM Cloud account. You will
need to register for an IBM Cloud account. While both the IBM Cloud and ibm.com
both use your IBM ID, they are DIFFERENT domains.
When you sign up for your IBM ID, use a valid
email address as your user ID. You will
need to VALIDATE your account by responding to an email that is sent to (you
guessed it!) your user ID. So in my case
I cannot sign up for an IBM ID at tox_is_awesome@acme.com
(unless I have convinced my corporate IT folks to give me that email address).
Now let’s get back to finding those cloud resources that we
created. Once you see what context you
are in, you will have a better idea of what you can EXPECT to see. Since I am an Acme Co. employee, I have been
added as an approved user of the Acme corporate account. What does this mean? Well the Acme corporation created a different
account, a corporate account, associated with a service account called IBM_Cloud_Admin@acme.com. This account has a subscription which
provides it with a set amount of “credits” for IBM Cloud services, which it
burns down over time. Since I am a
member of this account, I can create IBM Cloud services in this corporate
account, and their costs get assigned to the corporate account. IBM Cloud services are billed based on where
they are LOCATED (logically), and not based on who created them.
So now you hopefully have a better feel for how your account
fits into the grand scheme of things, maybe you can find out WHERE that Watson
service that you created is located, by looking at the various different
contexts that you operate in.
Advanced Developer Note: Your IBM ID is based on an email ID. So I have an IBM ID for tox@acme.com, but I also have one associated with my personal email address (tox_is_awesome@freebiemailcorp.com). I use my acme.com account for doing my regular work, and I use my personal email based ID to do open source work. That account is a trial account (or maybe I even attach my personal credit card to it), and I am careful not to rack up big charges on the account. I use it for doing simple little things in the cloud environment.
I Cannot Work With Something I Created
These situations are a little different. You are able to create some service, but you
are then unable to access it. Either the
service is broken, or down, or just not responding to your repeated attempts to
use it. Or maybe you can see a service
but you just cannot create it.
So let’s go back to that tox@acme.com
account. First of all, you need to check
and make sure that the account that you are attempting to create a service in
is able to pay for that service. If the
account has a credit card associated with it, which guarantees payment for
cloud services used, then the account is referred to as a “PAYGO” (short for
pay-as-you-go) account. People who use
things like GitHub and other SaaS based services should be familiar with this
model. If the account has prepaid for
services, via an IBM Cloud subscription, then it is referred to as a
“SUBSCRIPTION” account. Either “PAYGO”
or “SUBSCRIPTION” accounts can create any type of service. Your personal account might not have a
guaranteed payment method, like my tox_is_awesome@freebiemailcorp.com
account. In that case you have a “TRIAL”
account. “TRIAL” accounts can create
lite (or no charge) instances of most services on the IBM Cloud. TRIAL accounts will not be able to create
more robust versions of those services until they either become “PAYGO” or
“SUBSCRIPTION” accounts.
So let’s get back to our example. My tox_is_awesome@freebiemailcorp.com account is a “TRIAL” account (I’m not paying for anything!), but since I am an approved user of the IBM_Cloud_Admin@acme.com account (which is a “SUBSCRIPTION” account), I can create non-lite service instances within THAT account. There is one hitch…. I have to have PERMISSIONS granted to me to be able to see particular logical areas of the Acme IBM_Cloud_Admin account.
What Are These “Logical” Areas?
There are two different types of logical areas where IBM
Cloud resources can be created. Each is
based on a different security model.
The Cloud Foundry security model uses the concept of
Organizations (called “ORGs”) and Spaces.
These “Orgs” and “Spaces” live in a hierarchal model, with a single Org
hosting one or more Spaces. The
administrator/owner of an IBM Cloud account will create these Orgs and Spaces,
and will assign people various roles in each org/space. These roles determine what a user can do
within that particular logical environment.
You need to make sure that your account has access to the orgs and
spaces that you need to work in.
The IBM Access Management (IAM) security model is based on
Resource Groups. Each resource group may
have a series of Access Groups associated with it, and these Access Groups can
be used to provide fine-grained access controls and role management. You need to make sure that your account is
enabled to do what is needed for the resource groups that you need to work in.
You can learn all about Orgs, Spaces, Resource Groups, Access Groups and best practices for organizing your IBM Cloud account by reading my blog post entitled, Getting Started Right on the IBM Cloud.
In the past couple of weeks, I have seen a few comments from my customers complaining about the lack of “sufficient” API documentation for the various Watson API’s. I used to like to point my customers to the Swagger API documentation, but I can’t seem to find it anymore. So I asked some of my fellow IBM folks if they knew where these pages were. They didn’t know, they just had some vague notion that they were no longer supported.
I miss those Swagger API pages – so I found out how to get them. The IBM development teams no longer host these pages, but you can generate them for yourself, whenever you want, but just following this short little guide.
Go Ahead – Get That Swagger
Step 1 – Figure out which API you want to generate a Swagger page for. Go to the IBM Cloud catalog, and select the service that you want to see. For the purposes of this example, I’ll go and look at the Watson Assistant service.
Step 2 – Get to the API Documentation page by clicking on the link titled View API Docs – as shown below.
Step 2a – You can skip all of this hassle by just going to the IBM Cloud API Docs page, and then selecting the specific API documentation page that you are looking for (which in our case is Watson Assistant v1). This is much quicker – and easier to bookmark and remember.
Step 3 – You are now on the Watson Assistant API (V1) page. Look for the ellipsis in the white text portion of the UI, as shown below, and click on it. Save a version of the API by selecting Download OpenAPI Definition. This will download a JSON file to your local machine.
Step 5 – In the Swagger editor window, select File -> Import File. Then select your recently downloaded Watson API JSON file (from Step 3).
You can now look at the Swagger API version of the Watson API documentation. This allows you to see all of the API calls for the service, along with the various parameters, and the responses. It also allows you to try to use the interface in an interactive manner. Pretty nice!!