

This has also been published at Medium.com.
In my earlier blog post, IBM Watson Fueled Chatbots — For Our Health, I talked about the costs and benefits of a chatbot, and showed you how a chatbot is within the reach of most organizations. I also walked you through a step-by-step guide of creating that initial chatbot. It’s not that hard to do, and the costs are minimal (or even zero if you take advantage of the IBM “Citizen Chatbot” campaign). Once you get that initial chatbot deployed, you have to update it. Given how fluid the current situation is in many locations, in terms of the guidance and response to the Covid-19 pandemic, you will be changing things OFTEN. So how do we do that? How do we maintain our chatbot?
In the following sections, I will briefly touch on how to do some basic things in Watson Assistant. You will want to find more complete guidance on all sorts of topics on our Watson Assistant landing pages, or even in the product documentation. I’ll try to make this as generic as possible since everyone will have slightly different implementations of things.
Getting Comfortable with Your Watson Chatbot
A good way to become familiar with your Watson Assistant implementation is to run some k-fold testing against it, and to look at and understand the results. The Python notebooks used for these can help you begin to understand what your chatbot is doing, how it is doing it, and gives you a foundation of test results to build on. I’ll cover this entire topic in a different post.
If you’re uncomfortable with this, you can just open up your Watson Assistant instance, and navigate into your Dialog skill. Once in there, go and look at your intents. Get familiar with the intents that you are looking for. You can export the training data for your intents. Just click on the “Export Intents” icon, and specify a CSV file to export to.
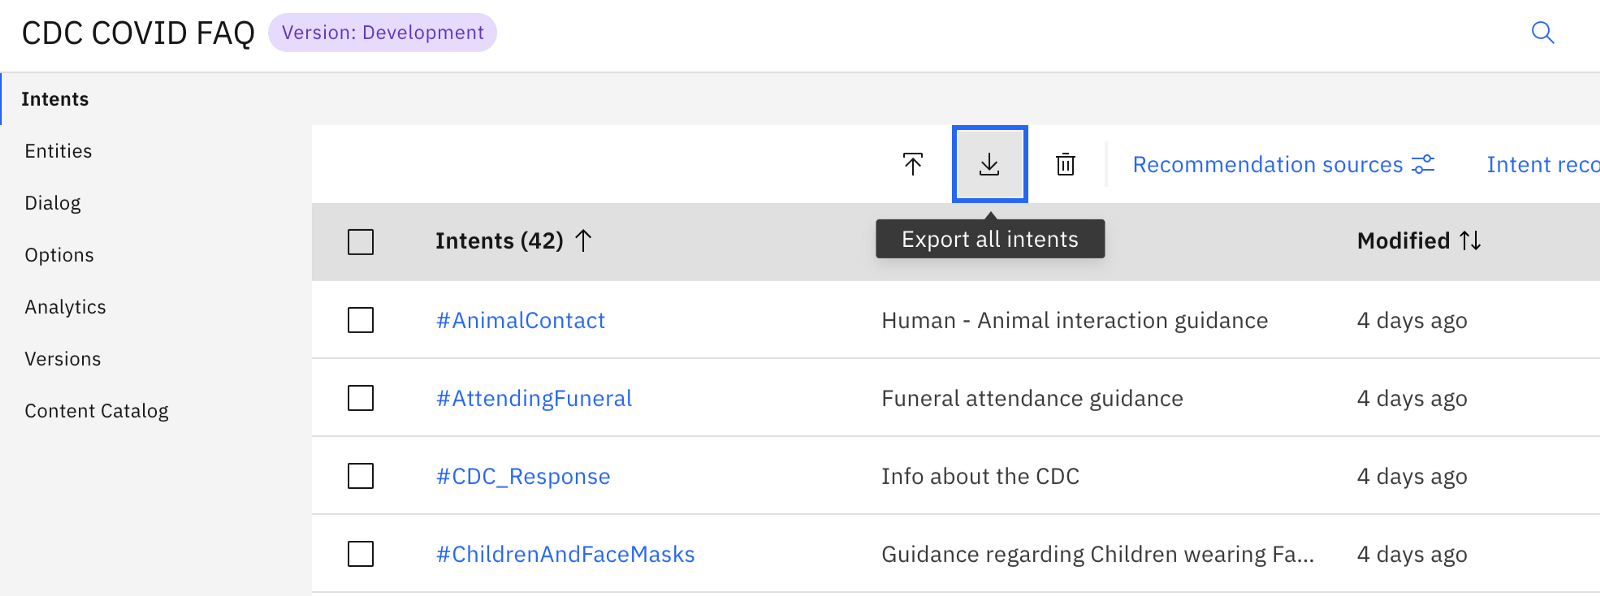
Once that file has been exported, you can open the CSV file and see all of the training data and intents. Use this same approach to export your entities and their training data, so you can familiarize yourself with those as well.
I will often keep a list of intents and their general topics on a single sheet of paper, along with entities and their focus, on my desk. It will help me keep things straight when I go in and begin to make changes to the existing dialog nodes. The typical list might look something like this:
#AnimalContact — Human and animal interaction and guidelines
#AttendingFuneral — info on funerals and attendance
…
@phone — US phone number pattern xxx-xxx-xxxx
@school_type — high school, college, etc
Simple Changes to Specific Responses
Making simple changes to the “canned” responses that our chatbot has is pretty easy. It’s also one of the best ways to begin learning and getting comfortable with the Watson Assistant.
So what can we do? Let’s start at the beginning (always a great place to start!), and jump into our Watson Assistant dialog skill. Once in, click on the “Dialog” menu option, to display the dialog tree. Remember that the dialog tree nodes are evaluated for each user interaction, and they get evaluated starting from the top, and continuing to the bottom of the tree.
Take a look at the top node in your dialog tree. You can see that it has a name, followed by a section asking if the assistant recognizes some event. This is evaluating the user’s input, and looking at the intent and possibly the entities. The next section describes what happens if that particular condition is met. This section is the first place to focus — since most new chatbots are built with some “pre-built” intents, entities and dialog nodes. They also have text that may not match what you want to say, or how you want to say it. Take this example from my earlier IBM Watson Fueled Chatbots post. Look at the dialog node titled “Naming of virus”. There is a long description of the virus name and origination — you might want your response to be a bit more brief. Go ahead and change it. Then use the “Try it” button to open a dialog and test out your change. Type in “why is it named covid-19”, and you should be able to see what your modified response looks like.
When dealing with chatbots where you may have reused the data and settings from an earlier chatbot, it is often best to step through each node in a dialog tree, and assess the answer being given back to the end-user. Is this answer accurate for my end users? Does it fit in with the overall approach of my chatbot? Is the personality of my chatbot maintained? For some tips on effective chatbots (and the importance of chatbot personality), check out some of the articles on chatbot success factors and best practices, like Conversational Assistants and Quality with Watson Assistant — Revisited and Best Practices for Building and Maintaining a Chatbot.
Pro Tip: When writing out the text in a Dialog answer, use the markup language instead of HTML tags. Markup language will get processed properly by speech engines and integrations, while HTML tags will not always be properly processed. For example, use “you should **ALWAYS** wash your hands”, instead of, “you should <B>ALWAYS<\B> wash your hands”.
What Do Our Users Want?
The next steps to take in doing some ongoing improvements and changes to your chatbot involve making some changes to what you are answering. What types of questions are your end-users asking? What new conditions have come up, conditions that need to be addressed? Do we have changes to existing guidance offered by our chatbot?
In order to find the answers to these types of questions, we’ll take advantage of something that is unique to Watson Assistant Plus editions, and not available in the traditional Watson Assistant instances. We’ll utilize the analytics associated with the operation of our chatbot.
Go into your Watson Assistant instance, and then drop into the dialog skill that you are interested in. Then click on the “Analytics” option in the left-hand nav bar. You will see a screen that looks similar to the one shown below. It has a few graphs and some interesting looking data. What should we focus on?

I tend to look in certain areas when I initially begin to look at chatbot performance.
- Weak understanding — this number represents the user statements that our chatbot had a tough time figuring out. This is an obvious area to address.
- Active Users — this number shows how well your solution is being adopted. It can also help you anticipate any increase in costs.
- Top Intents and Top Entities — these two lists give you an idea of the areas that are being hardest hit with questions. You can see what people are asking about most often, and track how this might change over time.
When looking at the weak understanding box, click on the “View Logs” link. This will now show you logs of all of the conversations that your chatbot has had over some time period. The first view you see here is filtered — it is showing conversations where no entities were detected, and where no intent was detected. These are the questions that you had no answer for. When looking to improve your chatbot, this is typically a great place to start. See what kinds of questions are NOT being answered.
Gather a list of the legitimate questions that you want to address. Begin to organize these into rough groups. See if there are patterns. Some things that you should be looking for:
- Do you see 5 to 10 different user inquiries that are asking the same basic question? That is a candidate for a new intent.
- Do you see some new terms showing up a lot? Are particular slang terms beginning to emerge? These can be added to existing entities, or could be new entities that you want to identify.
- Do you have any user questions that should have gone to a particular intent, but didn’t? Those user statements (commonly referred to as utterances) should be added to the training data.
What Types of Things Do We Deal With?
OK — so you have determined some areas and types of questions that you are not answering. How do we want to address these things?
The first thing to do is to improve your existing intents. You should add user utterances that were incorrectly classified, or went unclassified, to the training data for the intent that they should map to. The only exception to this is if you have more than 40 examples already in place for a particular intent. In that case, you should begin to remove similar utterances from the training data for that intent — for each one that you add, you should remove one. Otherwise, you may run into the problem of overfitting.
The next thing to do is to identify any new entities that you have. I suggest that you recognize and get these entities defined in your Watson Assistant dialog skill. After you have added these entities to your dialog skill, you should then go and begin to look at the individual dialog nodes that you already have, and determine if any of your responses can be modified to provide more targeted information based on these new entities.
Then it’s time to look at your potential new intents. Keep in mind that one or two utterances about something odd is NOT an intent. For any quality intent that you want to create, you should have at least 10 utterances. You should also check those utterances and make sure that they do not “collide” with, or replicate, utterances associated with other already existing intents.
Finally, it’s time to go through your dialog nodes and begin adding dialog nodes that will handle your new intents. You should handle the simple cases first — then you can begin to branch out and handle some of the more complex scenarios with dialog nodes. When you get to that point, don’t forget to check out these dialog building tips, they provide some good guidance from experts who have been doing this for a long time.
The most simple scenario to handle with a dialog node is just directly answering a question linked to some intent. Here is an example:
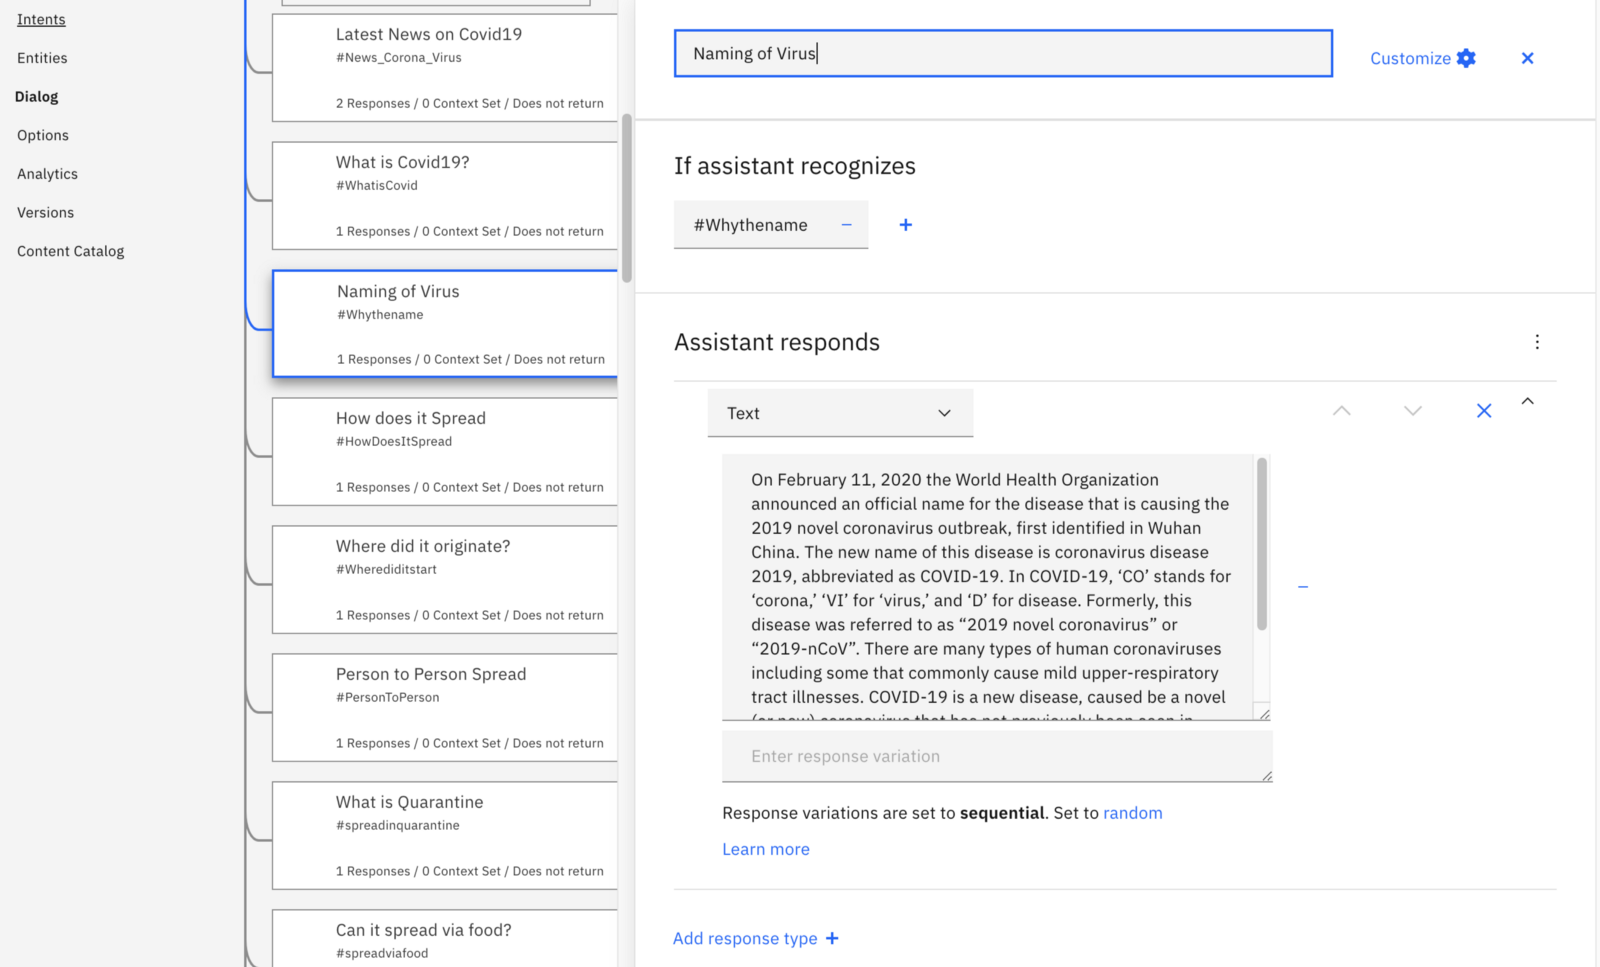
At the top of the node you can see it’s name. The name is only important as a way for you to identify a node — what it does, what it answers. Make it brief, but descriptive. Next to the name is the “Customize” button, we won’t be using that for our simple dialog node example. Next is the trigger condition — in this example, we are triggering on “#Whythename”. The hashtag in front indicates that this is an intent (#intent), if there was an ampersand in front of the name then we would be referencing an entity (@entity). You can link intents and entities, as well as context variables, to further refine your dialog node actions. Since this is a simple dialog node, we’ll just trigger on a single intent. Finally, there is the response section. This response is just some text, but responses can take many forms. Try to keep your text responses simple and brief, you want to help your users, not bury them with details.
Now We Know Everything, Right?
Not really. You know how to do some of the easier things to improve your chatbot. At this point, you need to begin implementing some automated testing of your chatbot. This will help you get some objective measures of chatbot accuracy and performance, and will also give you some insight into areas where your chatbot could stand to improve.
So the next thing to do is to implement some automated testing and the application of some DevOps principles. We’ll save that for our next blog post.
